Mirabelle Plum Wine Recipe (3 gallon batch)
(in progress recipe... adapted from homemadewine.wordpress.com and winemaking.jackkeller.net)
12 lbs Mirabelle plums (12 lbs before pitting. Halve and pit the plums, then freeze. Thaw before use)
1 lb golden raisins
5 campden tablets
1 tablespoon yeast nutrient
1/2 tablespoon acid blend
1 tablespoon Pectic Enzyme
1/2 tsp grap tannins
5 lbs sugar
Yeast- Red Star Champagne yeast.
Potassium sorbate (if sweetening before bottling)
filtered water
sanitizer

Mirabelle plums! These are from Cornell Orchards, bought at Indian Creek Orchards in Ithaca, New York. According to the information provided by Indian Creek, these are a particular variety that was developed by Cornell. In any case, they are lovely golden plums with rosy highlights that look a bit like an overgrown grape. They are a sweet for a plum, and seem to have skins that are light on the bitterness sometimes found in plums.
I halved and pitted the plums, then froze them in bags to help facilitate the breakdown of the pulp. I was using a recipe, but the quantity of fruit required seemed vague to me. It called for 9 lbs-- is that before or after processing? In any case, I stared with about 12 lbs of plums, and might have ended up with 6-7 lbs after pitting and processing? I'm a little unsure...
Since plum wine recipes complain incessantly about the lack of "body" in plum wine, I decided to try adding some raisins. These are golden raisins, soaked in hot water, 1- 15oz box.
I pulverized the softened raisins with a soup blender.

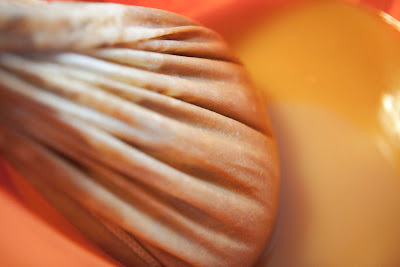
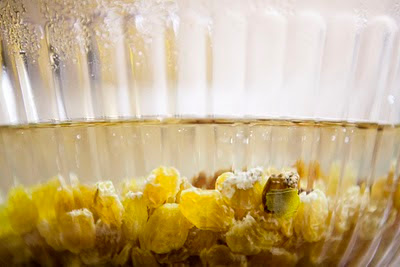
I put the plums and the raisins in the primary fermentation container-- in this case, an orange home depot 5 gallon bucket with lid, lined with a nylon bag (purchased from an online brewing supply store).

I added two crushed campden tablets to the plums and raisins. I would have added 3, since my target volume is 3 gallons, but I am assuming a healthy dose of sulfites from the golden raisins. Next time, if I remember, I will add a campden tablet to each bag of pitted plums BEFORE freezing to prevent oxidation-- there was a significant amount of oxidation that occurred on thawing.
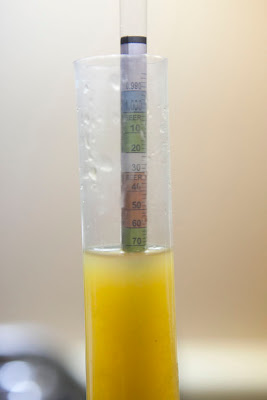
Before adding water or sugar, the specific gravity of the must was 1.072.

I added sugar water until the volume was about 3 gallons and the specific gravity was 1.1 (in this reading, the actual reading is 1.14, but with adjustment for the warm temperature of the must, it is about 1.1). I know there is a mathmatical way to figure out how much sugar and water to add... but I did it by trial and error, and took readings with my hydrometer until I got to 1.1.
After allowing the sulfites to work for 12 hours, add 1 tablepoon of pectic enzyme, to help further the breakdown of the fruit pulp.
After another 12 hours, add 1/2 tablespoon of Acid Blend, 1 tablespoon of Yeast Nutrient, and 1/2 tsp of grape tannin. Mix well.
Add your packet of yeast... in this case I used Champagne yeast. It was what I had in the refrigerator. Don't stir... just pour the packet on top, since oxygen is necessary to start the yeast in their fermentation. After an hour, the yeast should be bubbling and foaming-- you can then stir them into the must. Your wine is now underway!
For the next 5-7 days, the must should be stirred at least once a day with a clean, sterilized, non-porous spoon. When fermentation slows, or the specific gravity drops below 1.0, then you are ready to rack (Part II).


 Asarum Canadense roots. I ordered 12 from Prairie Moon Nursery, and they sent big, healthy looking rhizomes... I was surprised at how alive they looked!
 I also ordered some Trillium grandiflorum from Prairie moon, and they were also huge, healthy looking clumps of roots and shoots.
 Here are some of the bulbs... Fritillaria Meleagris (Checkered Lily) and Erythronium Pagoda (Trout Lily), if I remember correctly.
 My (first) order from Van Engelen. Here is what I planted this year:
 The one crocus blossom I managed to photograph before it was eaten by our ravenous deer.


 Mirabelle plums! These are from Cornell Orchards, bought at Indian Creek Orchards in Ithaca, New York. According to the information provided by Indian Creek, these are a particular variety that was developed by Cornell. In any case, they are lovely golden plums with rosy highlights that look a bit like an overgrown grape. They are a sweet for a plum, and seem to have skins that are light on the bitterness sometimes found in plums.

 I added two crushed campden tablets to the plums and raisins. I would have added 3, since my target volume is 3 gallons, but I am assuming a healthy dose of sulfites from the golden raisins. Next time, if I remember, I will add a campden tablet to each bag of pitted plums BEFORE freezing to prevent oxidation-- there was a significant amount of oxidation that occurred on thawing.

 Isn't it lovely? This was started on September 7th, and is now looking almost ready for a second racking. This wine started with about 11 lbs of plums (after pitting and partial skinning) and 1 lb of raisins.
 Julian holding the first tomato of the season. He got to eat it, too-- he said it was tasty!
 Health nuts have given the Crisp a reputation that is anything but decadent. Recipes abound for Crisps that are low-fat, low-carb, gluten-free, etc. If you're looking for one of those recipes, look elsewhere.
  Here is David with the straight piece of wood, cut to length with both ends angled to fit.
 The straight wood entering the steam machine.
 One hour later, the steamed wood is taken out...


 We did three arches, and as might be expected, the last is the most beautiful curve!

 So pretty!
 Here's the machine! The body of it is a piece of (6 inch?) PVC pipe.
 Here's the joint where the steam enters the pipe. The original version had a smaller pipe, but the larger diameter pipe made a huge difference in the effectiveness of the machine.
 Here's the connection to the kettle. The piece that enters the kettle was shaved to fit.
 In June, I bought one 6 pack of tomato plants and a single of a yellow bush variety tomato plant. When I first planted them, I planted 3 to a 1 gallon pot, and they were wanted to be replanted in less than a week! The cheapest large containers I could find were Home Depot's orange Homer buckets, which were $2.35 each. I purchased 7 of them, drilled holes in the bottom, and filled them with two giant bags of Espanoza Organic potting soil. I sure hope these tomatoes are worth all of this effort!


