I'm on a bit of a sewing spree here! There are a couple of good reasons for this. One is... I really missed my sewing machine. Rome was amazing, and I wouldn't have had any time to sew anyway, but four months without my machine was a long time. Another good reason to sew... I'm in a childcare gap, and there are lots of things I SHOULD be doing, but sewing is one of the few things I can do it little spurts and starts, with interruptions every 5 minutes. My writing projects aren't doing so well, except for blogging, which is about the only kind of writing I seem able to do in bits and pieces.
And another reason to sew: I didn't buy any clothes when I was in Italy, but I did buy fabric! Italian wool, silk, and... Denim!
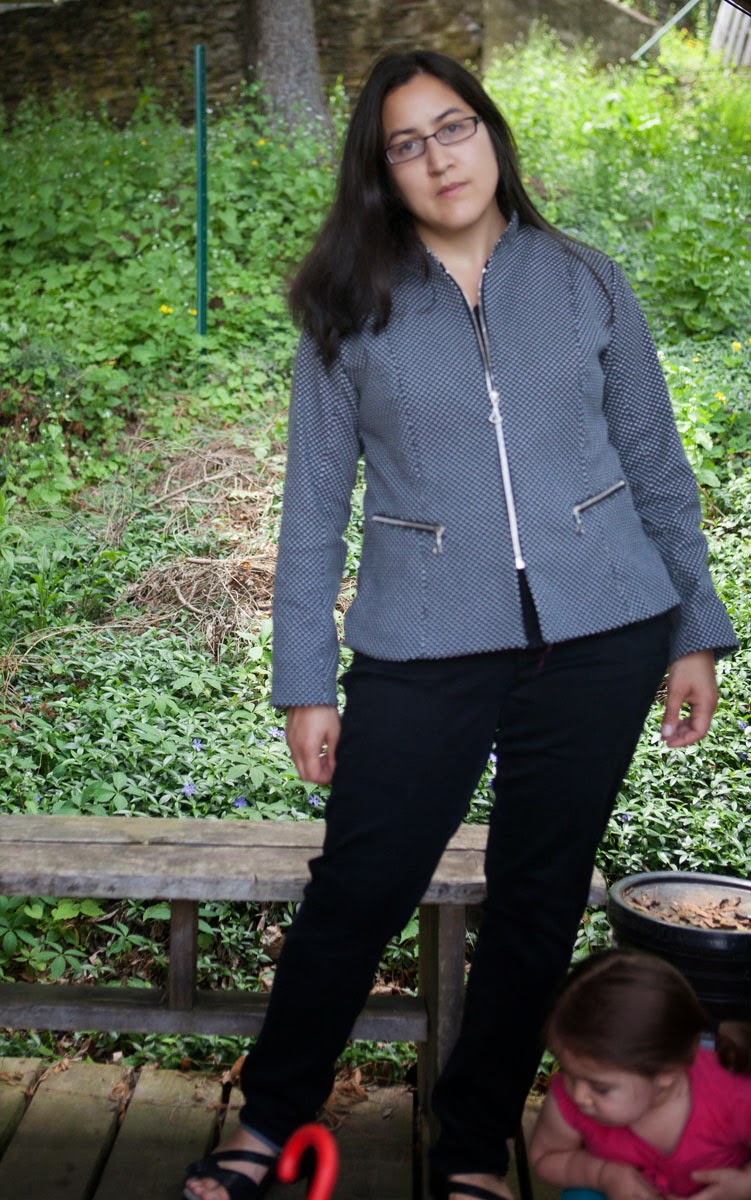
Okay, so maybe it is weird to buy denim in Italy, but I totally fell in love with this gorgeous printed denim. I was looking for polka dotted denim or wool, and wasn't finding any... and I decided tiny stars was even better! And, did I mention it is a S-T-R-E-T-C-H denim! I'm all about comfort in a blazer.
The pattern is
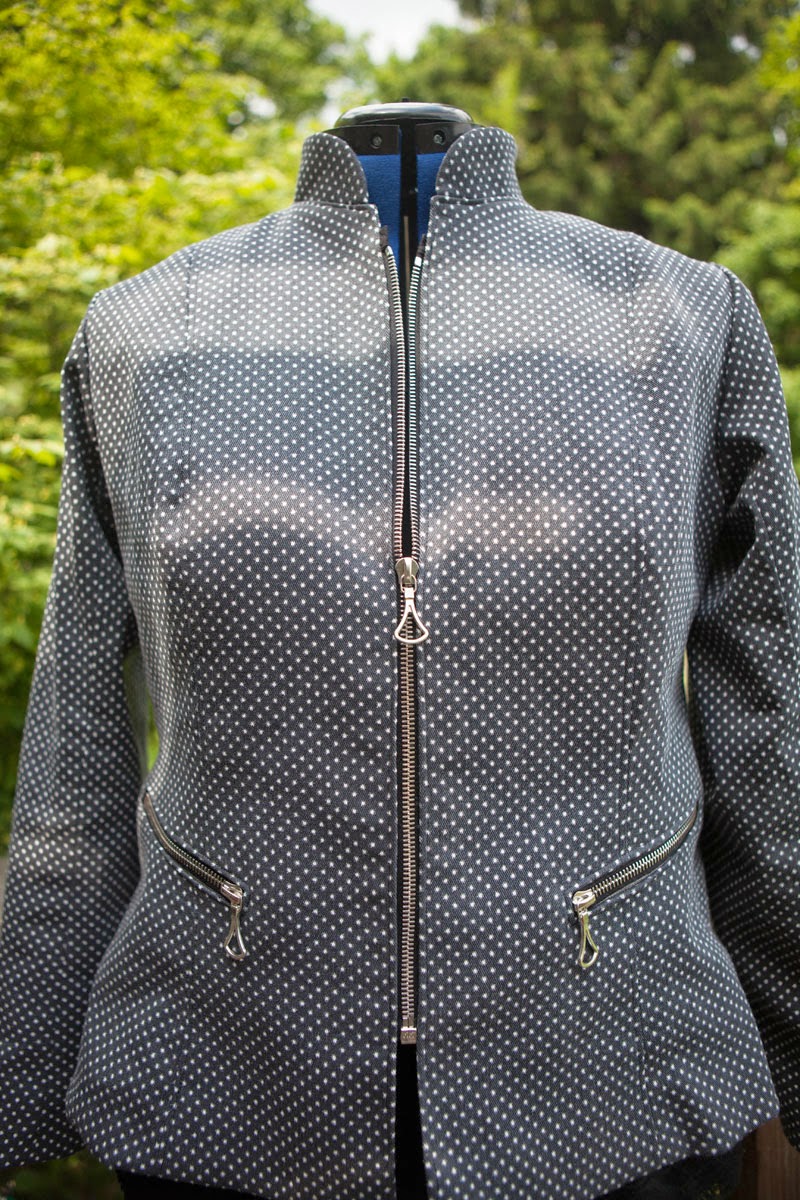
Simplicity 3628, a Threads pattern. It is a blazer with a mandarin collar. I just love mandarin collars-- they look classy and sporty at the same time, and just a touch Asian without being cliche. Also, lapels go out of style so quickly... too large, too small, etc.
I've had this pattern in my stash for forever. I think it is one of the first blazer patterns I purchased, but I haven't gotten around to sewing it until just now. It is a great pattern, I'm so glad I finally broke it out.
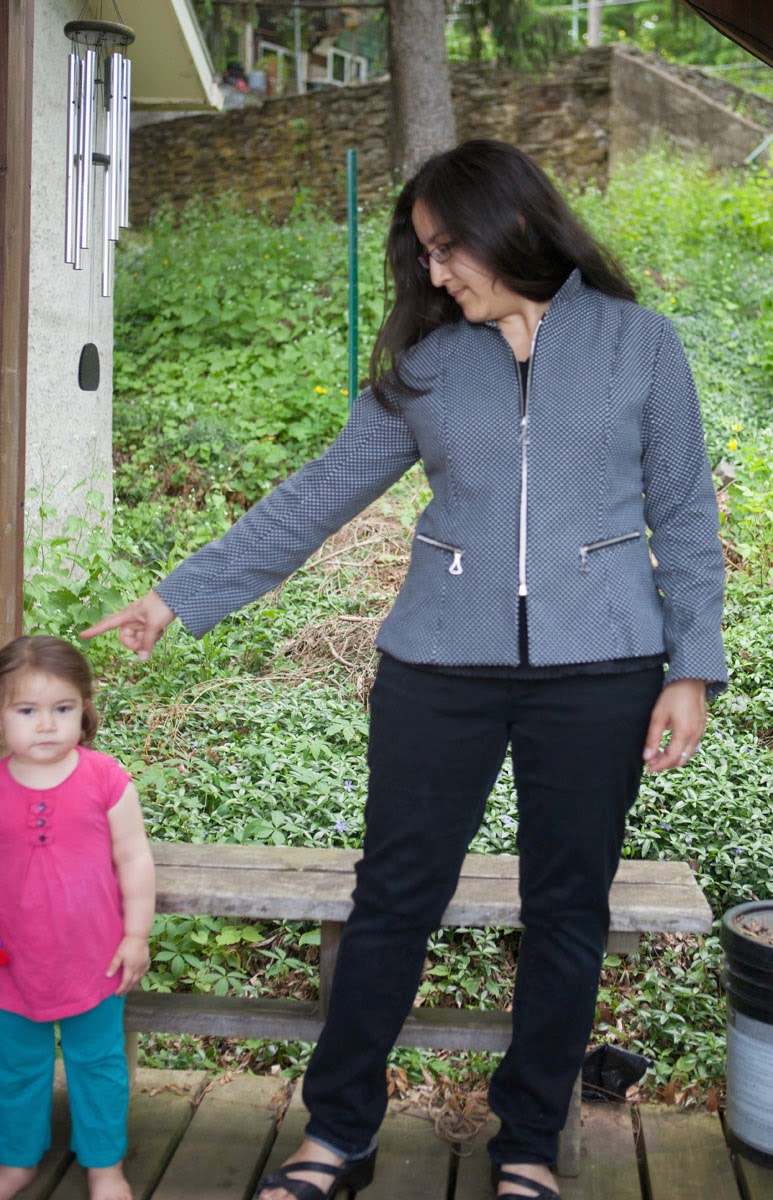
I did however make a few changes. Just a few. The biggest one is that I replaced the one piece sleeve with a two piece sleeve. I used
this method, it worked pretty well. It took two tries on my muslin, but I think it was worth it. I also significantly reduced the size of the sleeve head to reduce the amount of sleeve ease. Pretty much every Simplicity pattern I've tried has MUCH too much ease in the sleeves. I also thought that the denim wouldn't ease as well as a nice wool and I didn't want any gathers or puckers. I left just enough ease so that I got a bit of a head on the sleeve. To give the jacket a more tailored look, I also added a piece of wool felt to the sleeve head. To be honest I only skimmed the directions, but I don't think it told you to do this.

I also added zippers! This jacket would have been done weeks ago, but I couldn't find a decent zipper anywhere. WHERE do y'all buy zippers? I really wanted something nice... shiny metal with a classy, unique zipper pull, like what is on RTW blazers. I looked first at my local sewing store and their selection is just dismal. I even went back for a second look after failing to find anything great online, but I just couldn't see putting any of those dull-looking metal zippers with ugly, blocky zipper pulls on a jacket I had worked so hard on.
I finally got turned onto Riri zippers and ended up at
Pacific Trimming. This place is AWESOME, I am so glad I found them. I chatted online with one of their reps, and ended up buying a 36 inch separating zipper and 3 matching zipper pulls. I used the bottom 18 inches for the main zip on the jacket, and 6 inch pieces from the top to make the pocket zippers.
I don't think my pictures do these zippers justice. They are GORGEOUS. And super-smooth. The Riri zipper wasn't cheap ($15 for the zipper and $3 each for the pulls) but I would have ended up spending $15 buying 3 zippers at Joannes and I wouldn't have been nearly as happy with the finished product.
The original pattern uses hook and eyes or loops that are sewn in on one side. Adding an exposed zipper was really easy... this pattern is practically made for it. I just sewed in the zipper tape in between the front piece and the facing piece. The only tough part is making the two sides line up perfectly, and I thought I had that in the bag.... but you'll see what I mean later.
For the pockets I followed a
tutorial by Gertie on Youtube. Easier than a double welt, in my opinion!
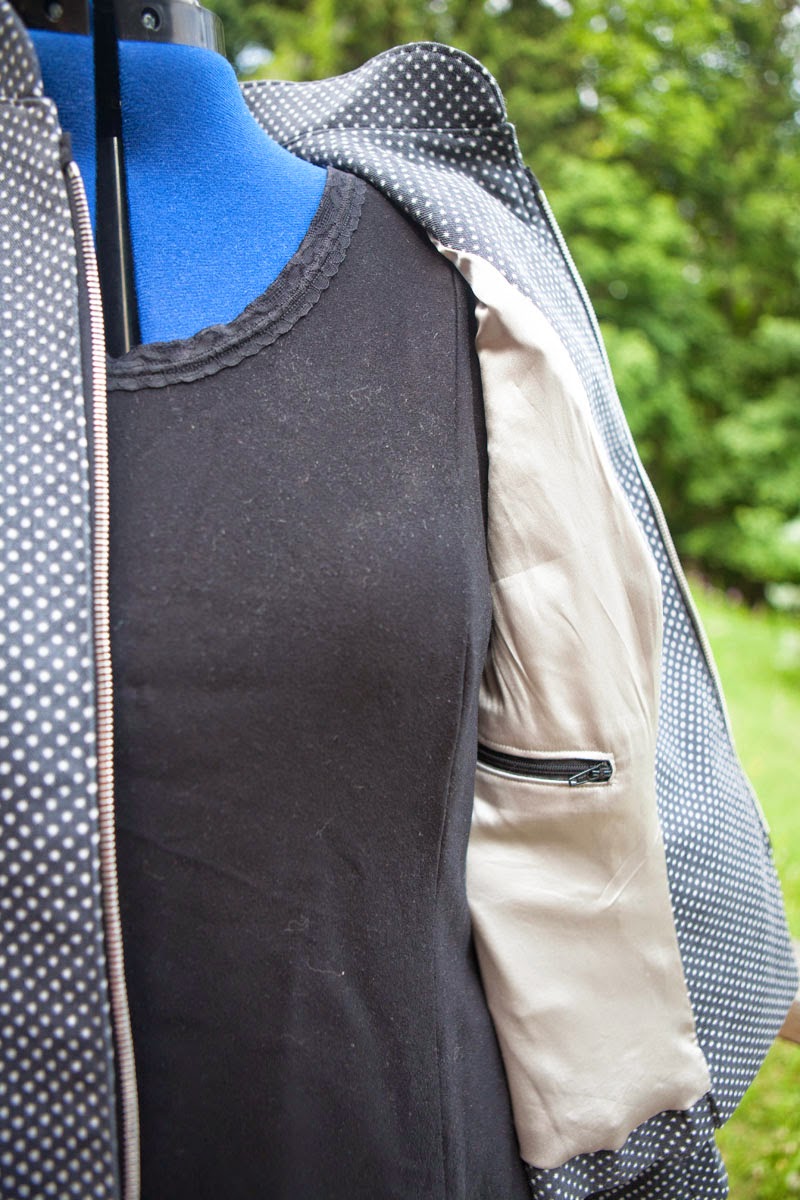
It was so easy that I even did one in the lining! I just love having an interior zipper pocket, it is one of the best things about sewing my own blazers. WHY don't RTW blazers for women have an interior pocket, it is sooooo useful. I think it is sexist that the guys get one and us ladies don't. I placed it just under the breast so when I put my wallet in it, it doesn't look like I have lopsided boobs!
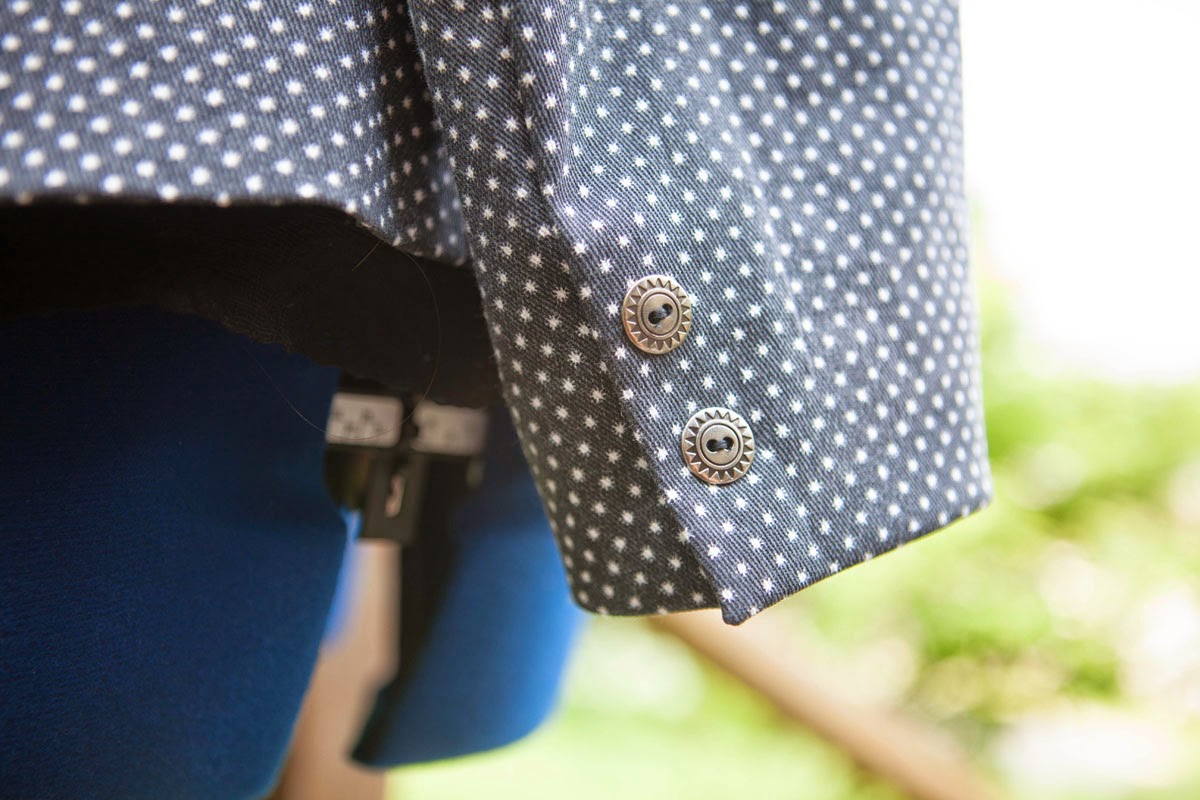
Since I had drafted a two piece sleeve, I also added sleeve vents. Sort of a lot of work for a non-functional vent, but they do look nice. I had never done them before, and t
his tutorial on Pattern/Scissors/Cloth was great. The buttons are La Mode from Joannes, they are inexpensive and there are lots of choices of styles.
It is lined in a gray stretch silk charmeuse from Mood from my stash. I love the luxuriousness of using silk for a lining, and I used stretch because my denim is a stretch denim. I used the bagging tutorial from
Threads and another one from
Grainline Studio. Both of these tutorials have you sew the lining to the front facing, and of course I didn't do that... I finished the jacket, then I finished the lining, and then I thought about how I was going to put them together. But the "bagging" works even if you do it this way... you just have to go around some annoying right angles. The only problem I had was that I didn't have a very deep hem.. only 1.25 inches in most places. I guess I made the jacket longer than the pattern. It wasn't a real problem, but it made the lining sort of close to sticking out, so I didn't leave much ease in the lining. As I was doing the final press, I realized that the lining was causing the back of the jacket to wrinkle-- it was too short! So I had to rip out the back section of the hem and allow a little more lining out of the seam, and the problem was solved. Fortunately I had an extra fabric on the lining seam allowance.

Okay, so here is the one bummer... the top of the jacket, just under the collar, doesn't line up! AAARRRGH! I only noticed it at the very end, I could have sworn it matched up before. It must be that one side turned more cleanly than the other and I didn't notice. Maybe I'll try to fix it, but it is a big pain to fix now that the lining is in and everything is topstitched. Maybe I'll just leave it. I rarely wear jackets zipped up all the way.
I really love this jacket! It fits me better than the jacket I made last summer (oh, another alteration is that I narrowed the shoulders, that was the thing I disliked most about the
last jacket I made... the shoulders are too broad for me). I also like the more casual styling of this one, the other one might be too tailored.