Monday, July 21, 2014

Stripey Soma Swimsuit, done Tankini-Style!

I'm so excited to have made my first swimsuit! Well, really, why not? Afterall, swimsuit shopping is just the worst thing ever! My current swimsuit is 8 years old, and I still remember the days and days of scouring stores and online shops for an swimsuit I would consider wearing in public. Somehow I doubt the situation has gotten any better out there in RTW-land, and I really don't want to find out.

Is my list of demands really that different from any other woman? Adequate coverage, straps that won't slide off of my shoulders, adequate lining to prevent embarassing show through, and cute! But it somehow seems impossible to satisfy all of those basic needs without doing it yourself.


I had been thinking about taking the plunge into swimwear, but I was emboldened to give it a go by the success of fellow bloggers Lauren and Sallie. They both used the Soma Swimsuit pattern from Papercut patterns, and both of theirs look fantastic!

I'm usually sort of a cheapskate when it comes to patterns, but I decided that this one was probably worth the extra $$-- and quite honestly, it is just a really cool pattern. And of course I have to have it NOW so I did the PDF download. Ulgh, I hate those things- the only thing good about them is the immediate gratification of having your pattern right away! But every time I question whether it is worth it because somehow I never end up with all of the pieces of the grand PDF puzzle, and there I am scouring the stupid file trying to figure out which page got eaten by the printer, or spirited away by my daughter when I wasn't looking. Anyhow, the pain was short-lived because the pieces for a swimsuit are just so small!


I didn't want to use my irreplaceable swimsuit fabric for the first go in case it was a total fiasco, so I ordered some stripes and solids from Spandex World. Wow do they ship fast, they had it on my doorstep the next day (well I do live in the state of New York). The quality of the striped lycra spandex is pretty darn good, thick and opaque with great recovery, and the solid "milliskin" is fantastic, nice and thick, shiny on one side and matte on the other. How they hold up to salt and chlorine remains to be seen!

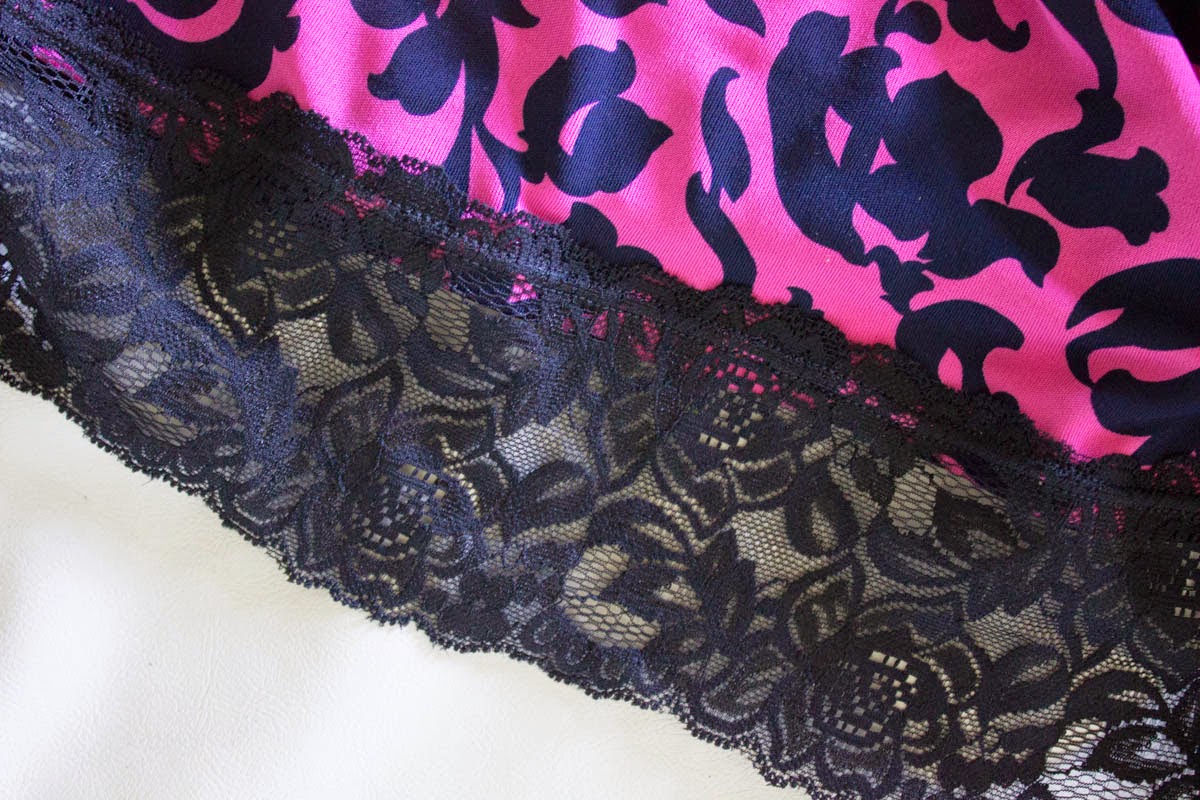
I ordered my other specialized supplies from Sew Sassy. The whole shebang didn't end up being very cheap, but I think ordered enough stuff to make swimsuits for myself and my daughter for the next couple of years... and who knows, I might even try my hand at lingerie next!


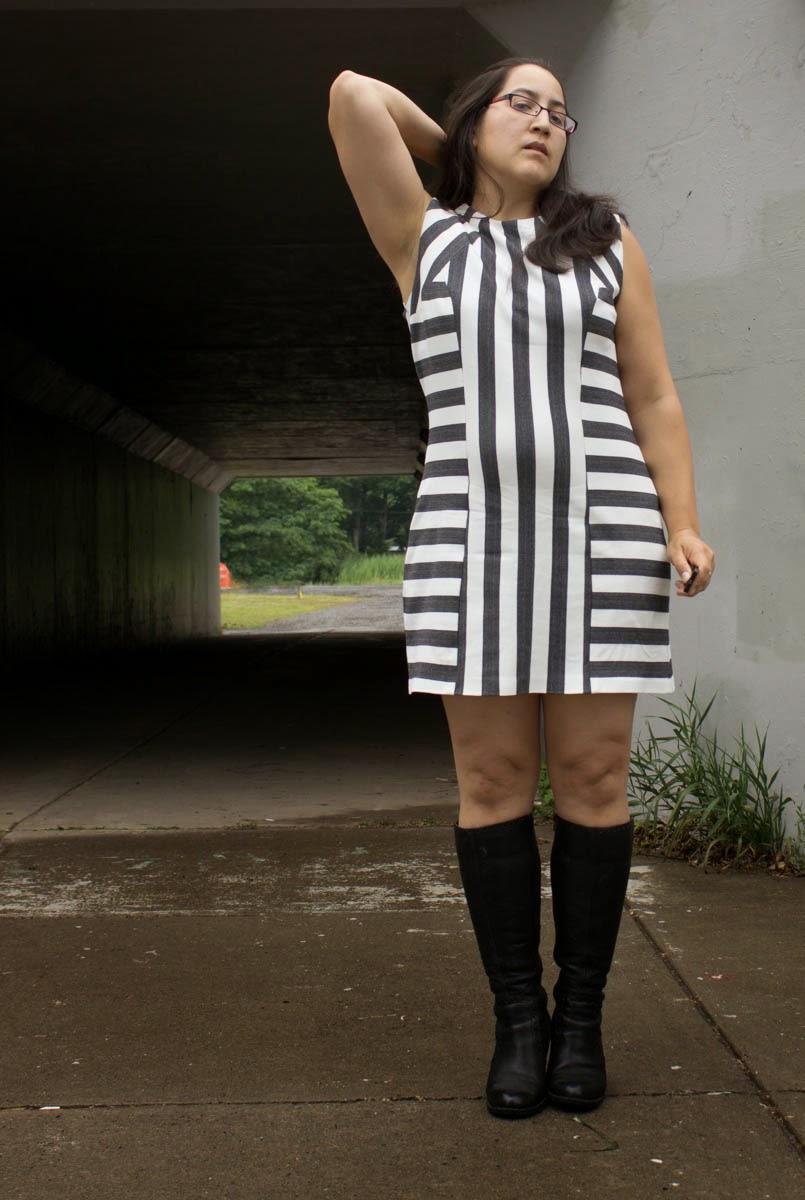
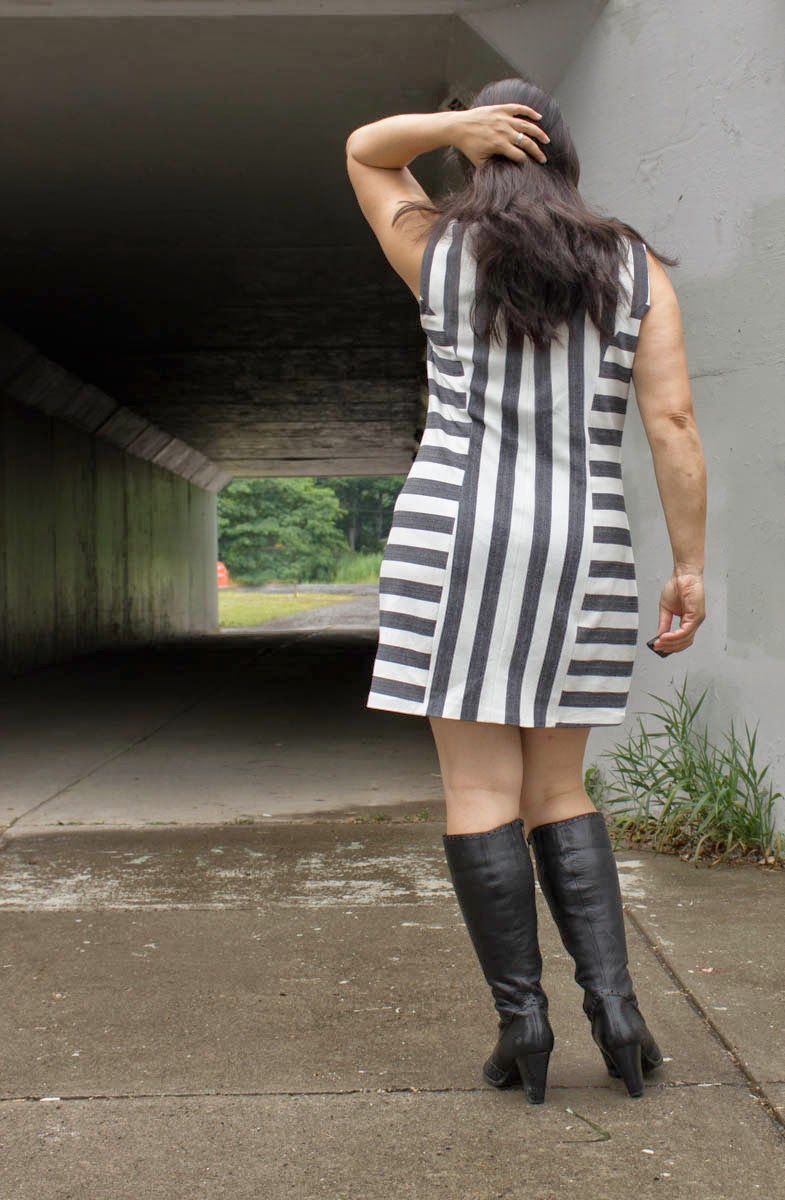
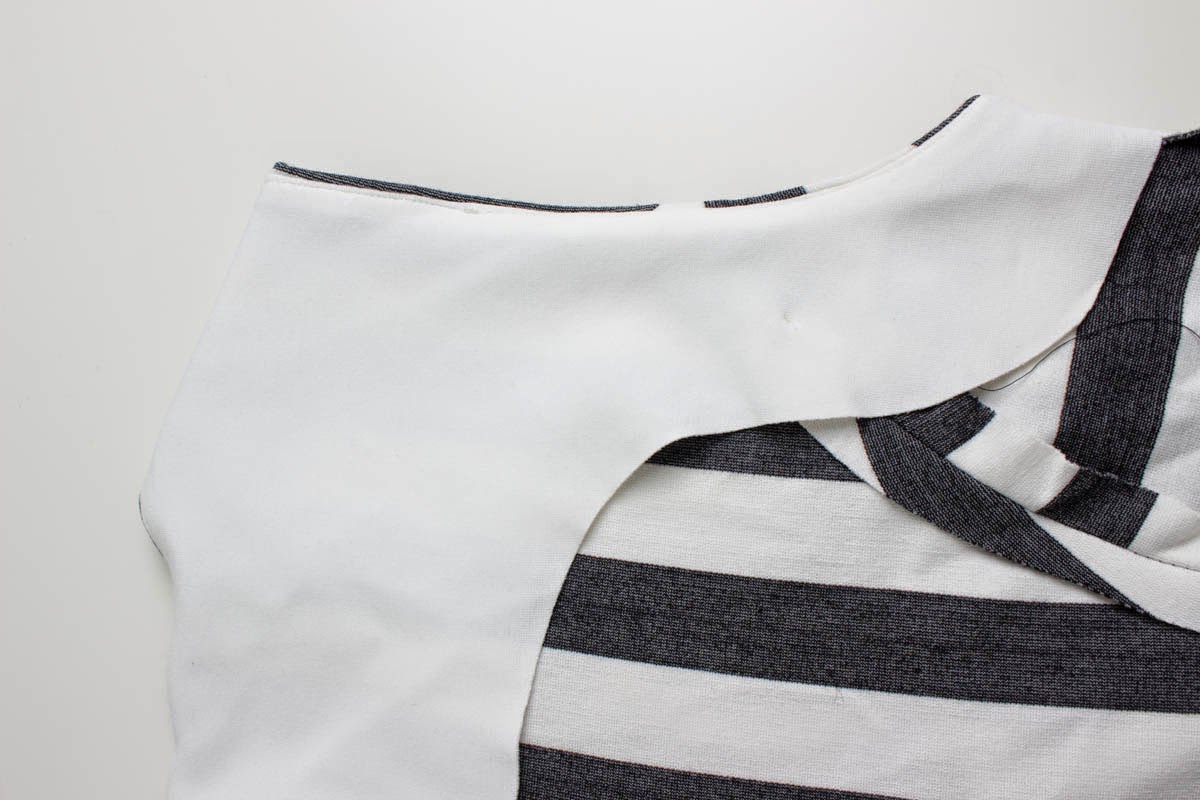
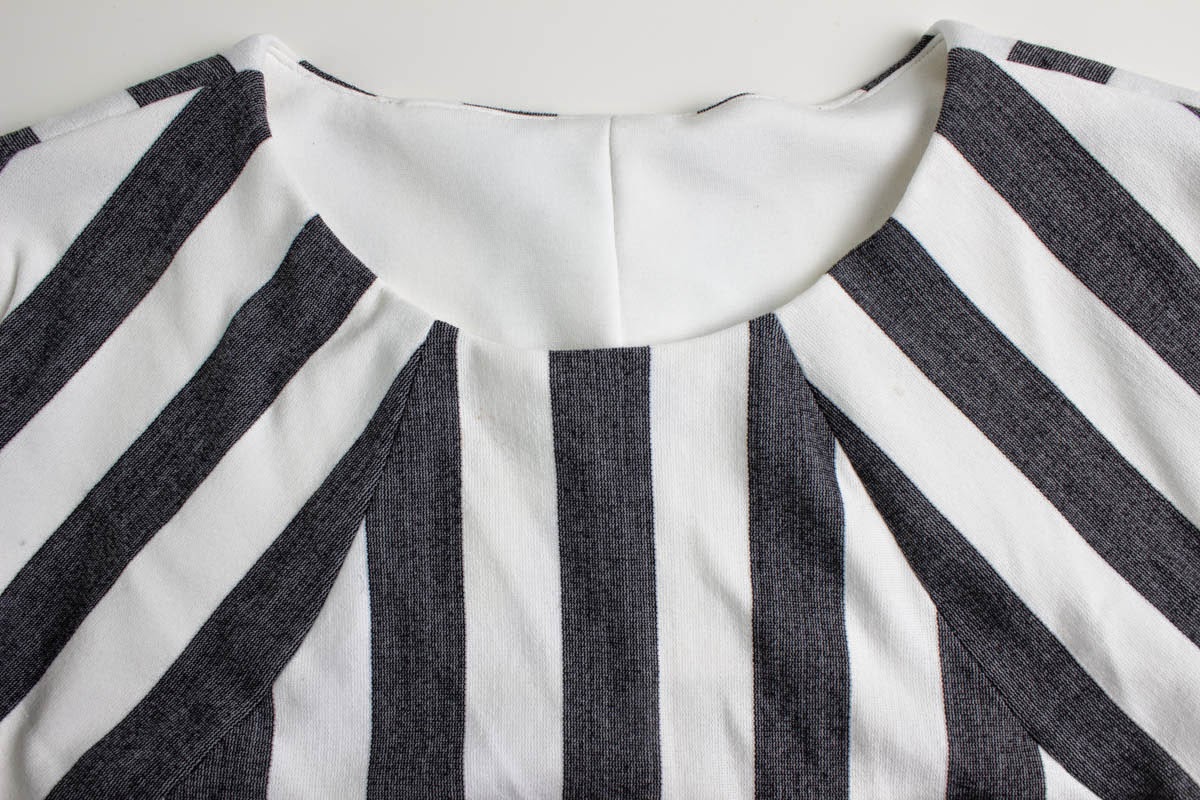
Okay, so I sort of ripped off Lauren's stripey idea... her navy striped soma is just fantastic and I just want one! I did play a bit with the orientation of my stripes, and after making a few sketches I decided to do the top of the cup vertical and the bottom horizontal.

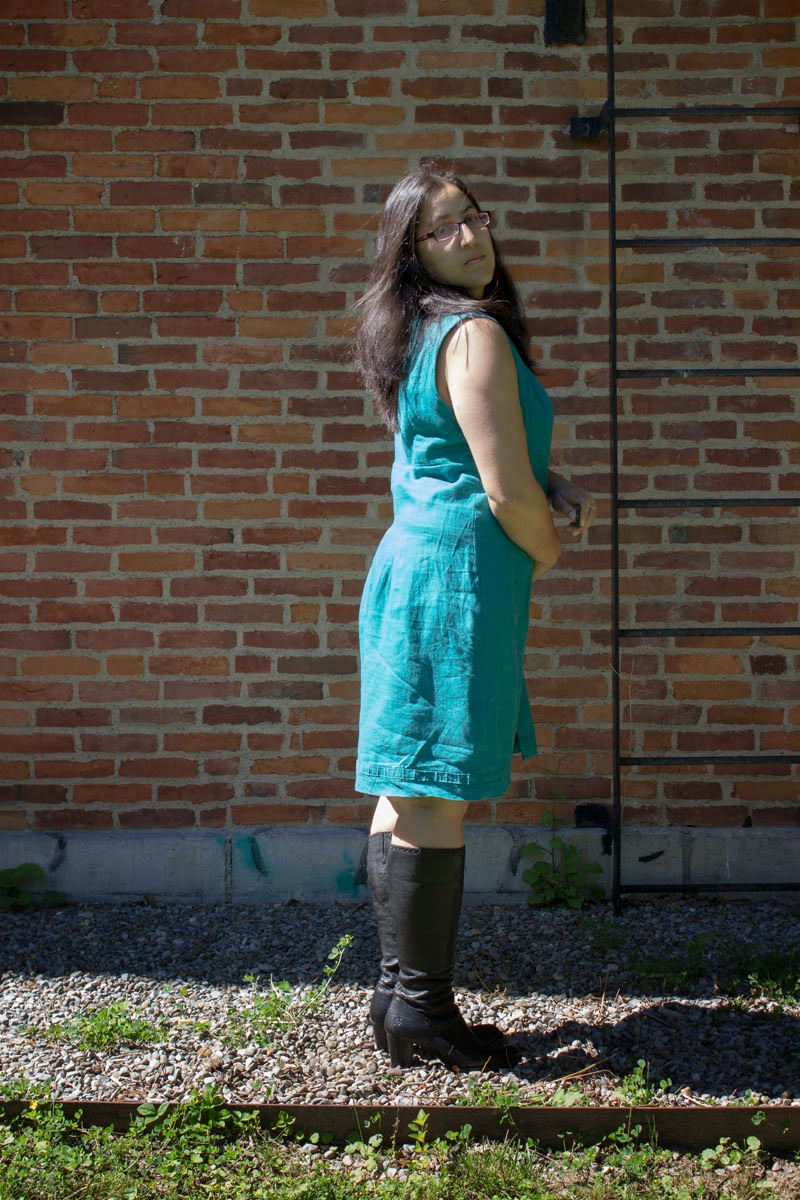
And of course my big change is to make the bikini into a tankini! After giving birth 2 years ago, my body isn't really bikini-ready yet, so I'm more comfortable lounging around at the pool with a bit more coverage. It was a pretty easy adaptation-- I just made the bikini as instructed, but rather than finish the bottom with elastic, I added a tube of fabric to make my tankini. The top measurement of the tube is the finished measurement of the bottom of the bikini, and the bottom measurement of the tube is my hip measurement with about an inch of negative ease.


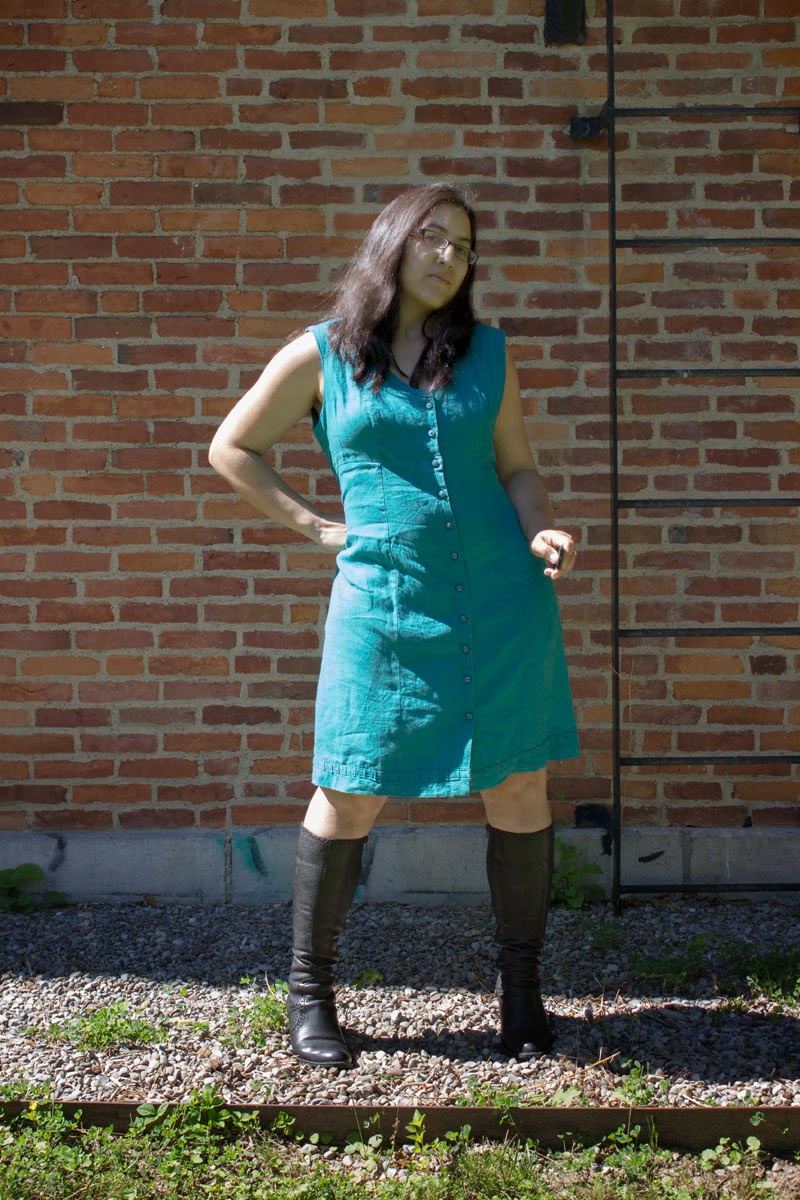
I cut a straight medium in the pattern, top and bottom. I'm probably about a size 12 in RTW and usually a 38C in bras. I measure a 39 bust and a 42 hip, so the medium is just about right. And I made absolutely no changes to the pattern in fitting, it all fit surprisingly well. Other than my tankini variation, I mostly followed the instructions. I can't remember the last time I followed instructions for a pattern... but the Soma instructions were really good, and I was clueless as to how to sew a swimsuit!

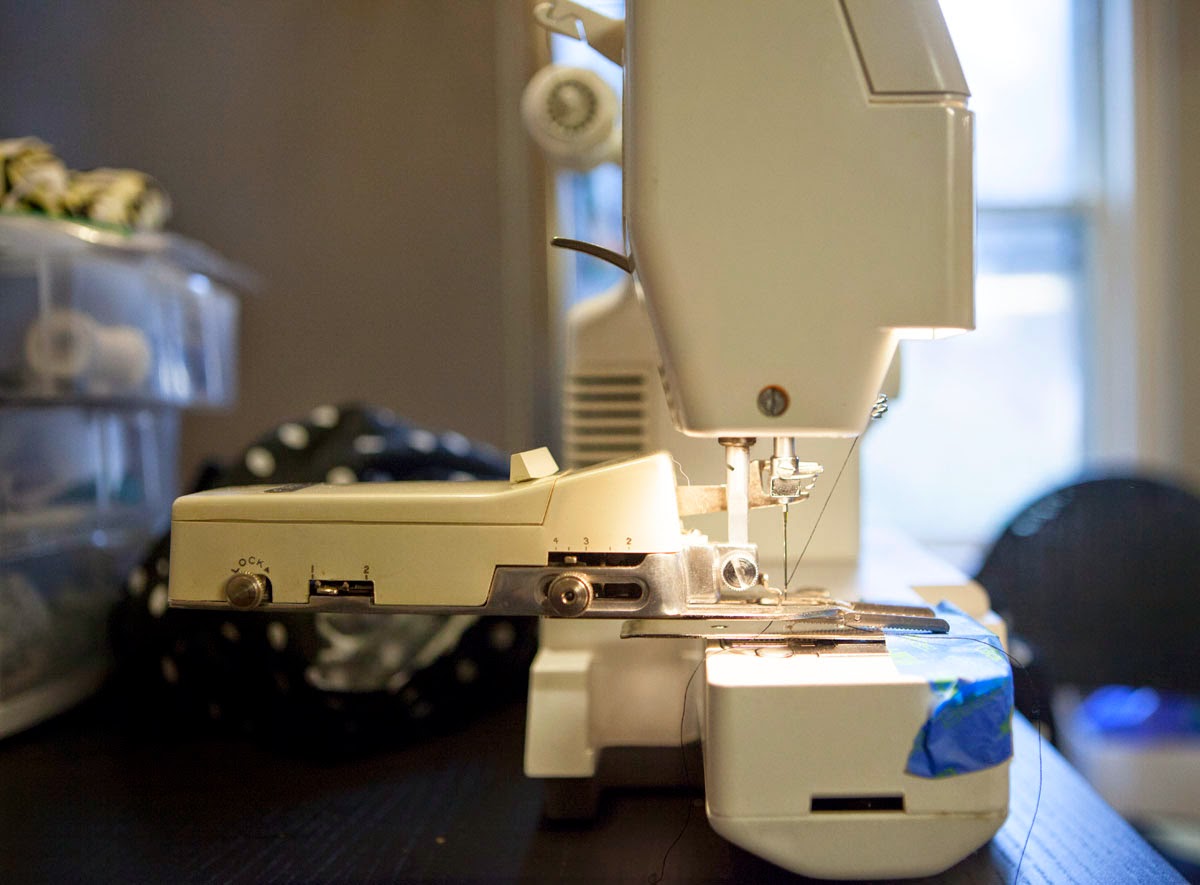
This was sort of an easy project, but also sort of a B-I-T-C-H. I'm not really sure why I was having so many problems. I have stretch needles and a walking foot and I sew knits and use elastic all of the time. But for some reason my machine was getting hung up on any little bump, and there are lots of them when you are always sewing down the ends to bits of elastic and strapping. I usually have to guide my fabric through rather forcefully, but it was worse than usual. And it was completely impossible to topstitch with a zigzag, which is what is called for all over the place in the directions. Because my machine was feeding so badly, the zigzag topstitch looked like it was done by a drunken seamstress no matter how carefully and slowly I tried to feed the fabric through my machine. I tried so many times I just ended up ditching the first cup and cutting out a new one, after I figured out the workaround- topstitching with a twin needle. Actually the twin needle topstitching looks pretty darn good, and more like a RTW swimsuit.


I don't know what is up with my machine... I started fantasizing about new machines, but probably the first step is to get it cleaned and tuned up, it is certainly overdue. But I'm likely to procrastinate on that because it's probably gonna be just fine for normal patterns that don't need gorgeous zigzagging.

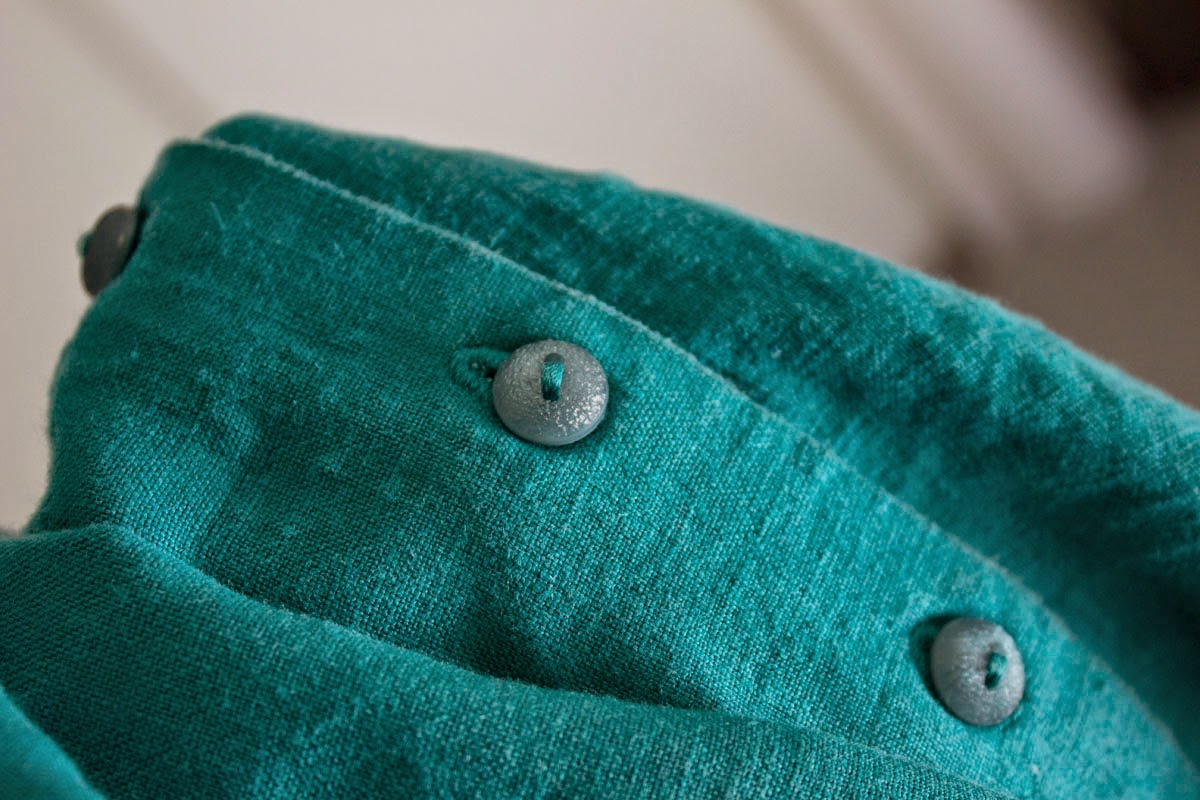
I followed Sallieoh's lead and lined the cups with lingerie foam from Sew Sassy. She suggested cutting out the upper and lower cups minus the seam allowance, and then inserting them after you sewed the center cup seam, using the topstitching to hold them in place. This was a bit fussy and there was a bit of swearing and unpicking, but generally worked well.


From Lauren's review I borrowed the idea of hiding the center triangle seams. I did it sort of like you would do a lining for a dress when you are doing it all on the machine, and it was sort of a squeeze, but it worked! No exposed inside seams on the bikini! But if anyone has any ideas on what to do to make straps look a bit more finished on the inside, I'm all ears. I guess trimming them a bit more would help...

I'm totally amazed by the fit of the bottoms. I did the mid-rise version, and they are PERFECT. How is that even possible, I am sooooo picky about swim bottoms, and I made absolutely no changes to the pattern. But they are just a great balance between coverage and a touch of cheek. They fit so well that I am totally thinking about using this pattern to make undies!


I had some fun with the strapping. I had the real-deal bra strapping called for in the pattern so I wasn't worried about the strength of the straps, but rather with the slide factor. I think I have the world's slopey-est shoulders-- I have yet to find a bra or bathing suit with normal shoulder straps that won't work their way down to my elbows in a matter of minutes. Rather than doing a simple cross back, I did double strapping that crosses on top of my shoulders. I think it looks sort of cool with the stripes, and it is totally secure.


I just love my new swimsuit... I can't wait to go find some water! Good thing we are headed to the shore next week!


Tuesday, July 15, 2014

Turquoise Linen Button Down Dress: Simplicity 2404

The inspiration for this dress was a color. When I was planning my summer wardrobe, I couldn't get the color turquoise out of my head. Not just any blue-green-- it had to be that particular blue-green that is the color of the caribbean ocean on a white-sand beach.


This is me immersed in salty turquoise water on our honeymoon to Eleuthera! Just look at that color, it is hard to believe it is real! Too bad we can't go back every year, it was amazing.

The best I could do this year was find that color in a luscious linen.


I scoured the internet and ended up finding it at Sawyerbrook Fabrics. They match buttons to fabrics, and I bought the matching buttons too since I knew I wanted to make a button-down dress.


These pictures don't do the buttons justice.. they are a bit like dichroic glass, and match the fabric perfectly. Sawyerbrook is sold out of this gorgeous color, but Mood still has the aqua linen that was a close runner up in my search.


I used the altered Simplicity 2404 pattern that I used to make the Polka Dot Linen Dress. For this dress, I had extended the pleats into princess seams and put in a button placket down the center front, and I did the same thing in this dress. To make it a little different, I used the rounded neck variation, but deepened the scoop a little to make it a bit more summery.


To make it extra special, I experimented with using some self fabric trim. I cut strips of the linen, folded the raw edges under, and sewed pleats into the strips. I didn't really measure it, I did it by eye so that it would have a structured but handmade look. I used the pleated strips as trim around the neckline and the around the hem.


I made the buttonholes using my singer "professional" buttonholer, which I bought on ebay over a year ago. Here are some pics of what it looks like on my machine-- it is quite a contraption! My machine is a Singer CP-17C.


I don't know how to lower the feed dogs (I'm not sure if it can be done??? If you know how, do point this out to me!) so I use the plate that comes with the buttonholer. It doesn't quite fit on my machine, so I tape it down temporarily. The screw doesn't tighten down enough either, so I use a washer to hold it in place. But once it is set up, with works great!


Look at how it sticks out the back, hilarious isn't it! The back part opens up to hold the buttonhole templates.


But take a look at these buttonholes! These are from my Polka Dot Linen dress, fresh off of the buttonholer. You really don't want to see what buttonholes look like on this machine without the buttonholer-- they are pretty terrible, despite hours of trying. With the buttonholer, they are quite decent and pleasant to make!


And here is one on the Turquoise Linen dress, with a couple months of hard wear. It isn't perfect, but it is holding up pretty well.


So a turquoise dress is not quite as good as a trip to the Caribbean, but it is fun all the same!


Thursday, July 10, 2014

Striped sheath: McCalls 6028

Confession: I envy other people's stripes. Someone will walk into a room in a great striped dress or top, and it is all I can do not to stare. And my favorite bloggers all have put up great stripes lately... Sallieoh's Candy Striper is fantastic, and Lauren at Lladybird's striped swimsuit is amazing! Like so amazing that I may have to make a swimsuit too... but that's for another post...

Well, stare away at my latest make! This is McCalls 6028, done up in a wide striped ponte knit from Emmaonesock. This might be my oufit along dress... I'm a little unsure, I think I have to try it out with the sweater, assuming I ever finish it. Since the sweater is chevron striped, I figured the dress had to be striped or solid. I went through my stash and rediscovered this fantastic striped ponte that I bought last year. And then I went through my pattern stash, and found McCalls 6028... what a perfect pairing! The only possible problem: I only had 1.5 yards, and the pattern calls for 2 1/8 for my usual 16/18 combo. Not to mention any extra for laying out the stripes!
But I still thought I could make it work (and obviously I did, since I'm showing off the end product-- Spoiler Alert!) First of all-- since the pattern is meant for a woven, I figured I could probably get away with several sizes smaller. After scrutinizing the actual dress measurements, I decided to go with a size 14, which only requires 1 and 5/8 yards. I spent a looooooong time laying out my pattern pieces, and ended up going considerably shorter than the pattern suggested. Actually, it is shorter than I would usually go. I think mid thigh is still decent though!

I was a little skeptical of this pattern since a couple people seemed to have problems with it in their reviews. But the Mahogany Stylist has a fantastic version in plaid and red piping, so I decided to give it a go. I didn't really follow the directions, but the bit that I did read was well written, had great tips, and seemed to have a totally sane order of construction. But as I said, I didn't really follow them, I just did my thing.


And I LOVE the fact that pattern has an all-in-one facing... I almost always have to draft this myself, and I like an all-in-one sooooo much more than separate neck and armhole interfacings that are always trying to sneak out no matter how I tack them. I did mine in a cream ponte from my stash, interfaced with knit interfacing from Fashion Sewing Supply-- the only interfacing I ever use anymore. I guess with a knit I could have done a binding instead of a facing, but I liked the clean look of the facing.

Since I had sewn the side seams already, getting the facing in was a bit of a trick. I wasn't going to unpick the side seams after spending all of that time matching the stripes. So I ended up using this method to machine sew the facing. It is a bit more time consuming, but it works!

No zipper-- with a stretchy knit, it just wasn't necessary!

For the hem, I totally cheated... I used no-sew hemming. I wanted it to look seamless, and it was going to be a trick to sew since at one point I had about a quarter of an inch to make my hem with. I probably could have hand sewed a blind seam, but I doubt it would have looked as perfect as the iron on hem!
Look a that strip matching! I had to redo my basting about 5 times to get it right.
And okay, it isn't perfect here. But I think it still looks pretty good. Note to self-- cut more carefully next time!
It is a pretty great dress, even if I do say so myself! Might keep stripe envy in check for a little while... well, until someone else walks into the room with some great stripes that I can't help but admire...

Monday, July 7, 2014

Hot Pink Milly Dress

Pink is a powerful color.

When I was a little girl, I couldn't get enough of it-- especially with yellow. All of the little girls I drew with my crayons had pink and yellow dresses. In high school I would never have been seen in pink, instead horrifying my mother with my desire to shop in the men's department for oversized shirts to wear with my black leggings and slouchy socks (it was the 80s!). In college I thought pink didn't do justice to a long history of the oppression of women. 

But in my mid 20s, I bought my first bikini (my mom didn't believe in such nonsense!): it was a hot pink triangle bikini. In my late 20s, I favored a hot pink bra top on days when I knew I was going to be on the sharp end, on lead for my mostly male climbing partners.

Now, as a mom and a wife, a bit of hot pink still makes a statement. It says: I'm a woman and not afraid if the world knows it!

When I saw this hot pink Milly silk jersey, I knew I had to have it. It is just beautiful fabric, opaque with a matte surface. It was actually much easier to work with than other silk jerseys I've worked with, not slippery at all.


 I chose a very simple pattern that I traced off of a BCBGMaxazria dress that I've had for years. The neckline is actually very clever, it is all one piece that folds over and becomes the facing for the inside of the neck and the armholes. Since it was jersey, I didn't do any seam finishes. The rest of the dress is a simple sheath.


I finished it with a 3 inch wide stretch lace. It is a very easy way to finish the hem, and I think it gives the dress just an extra bit of elegance.


The draped neckline is the same on the front and back, so it can be worn so that it is more drapey around the neck, or alternately, as an almost off-the shoulder look.


 I made this dress over 6 months ago and just haven't gotten around to blogging it yet. I even brought it to Rome with me, one of only 2 dresses I brought with me. The reason it made the cut was that it is a great packable dress. I can roll it up into a little ball, stuff it in a corner of my suitcase, and it looks fine when I pull it out to wear in the evening. Just try that with charmeuse or crepe!


Saturday, July 5, 2014

Outfit Along- Stripes!

I went yarn shopping, and came home with not one, but TWO colors for the sweater for the outfit along. Which means, STRIPES!


Stripes weren't in the original plan for the dress... so I also had to change the plan for the dress. I could see a pattern in black and white, or a solid, but instead I've decided to go for more STRIPES. This is a great wide stripe ponte from Emmaonesock that I had in my stash, and Mccalls 6028 is also in my stash waiting to be sewn.


I just love stripes, I can't quite get enough of them. The graphical possibilities are nearly endless. Vertical, horizontal, diagonal or somewhere in between, and then where they meet on the seams offer even more possibility for interesting interactions- chevrons, matching, deliberately not matching...!

McCalls 6028 has great seam lines which means lots of chances to play with stripe orientation. The only possible hitch in my plans is that I only have 1.5 yards of the stripey fabric, and the pattern calls for 2 1/8 in my usual size 16/18. I might be out of luck.

But there is hope. I might be able to make a smaller size since it is a woven pattern, and I'm using a stretch. Which means I'll figure out what size is exactly my measurements (with no ease)... and if I can manage a size 14, that size only calls for 1 5/8. Dress patterns tend to be far to long on me, so I'll almost surely be able to shorten it by a couple inches, and I don't need much fabric to hem a knit. And if necessary, I could so some of the panels in black or white ponte, which I have in my stash.