Fall sewing has officially begun! I decided to dive right into the season, going straight for my stash of wool and dusting off the clapper and ham.

I was waffling on what my next project would be, and then Marcy Tilton announced a jacket contest on her blog. I've always wanted to sew a Tilton jacket pattern... I own several, but haven't yet had the courage to launch into one. All of my blazers so far have been quite traditional, and I do love a nice trim, tailored jacket. But at the same time, I also love pattern and texture, and the fluid way that Tilton patterns encourage the mixing of fabrics has always intrigued me.

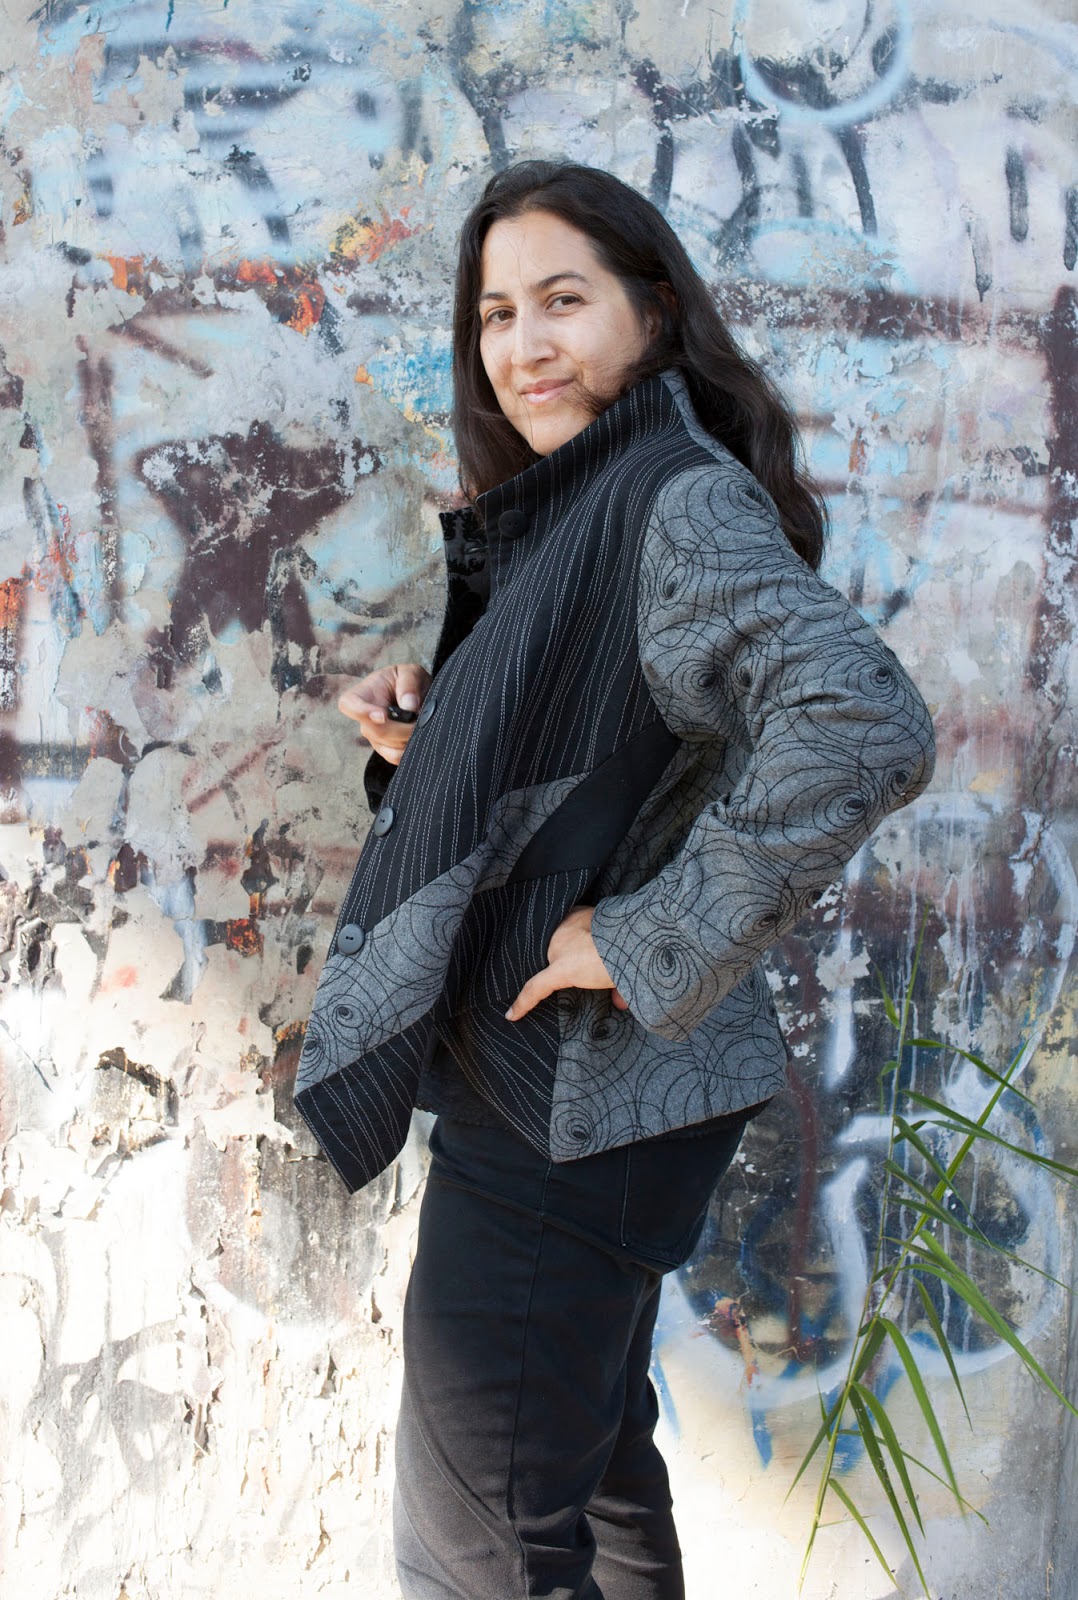
My first thought was Vogue 8430, which I've been meaning to make for years. Not only do I have the pattern, but I already had fabric purchased with this pattern in mind. If you haunt the Marcy Tilton fabric store like I do, you probably remember this fantastic embroidered gray wool. I traced off the pattern and had added a bit of shaping that I was just about to muslin when I came across Butterick 6106. The pattern lines opened up a host of new possibilities and I started sketching out possibilities from various fabrics in my stash.


So, I decided to do two right sides. But I also wanted to preserve some of the asymmetry, so I added an extra design line to my mirror of the right side... another strip that was similar in thickness, but set higher up.

I made some other minor fitting changes to streamline the jacket and help it hang a little closer to my body. The big one was adding shaping to the back seam... I generally have to do a bit of a swayback adjustment for dresses, so I did a similar adjustment, taking about 3/4 of an inch from the where the seam hit my lower back, and curving to nothing at the upper back and bottom edge of the jacket. I also curved the side seams, taking the seams in about 1/2 inch on each side at the waist and curving back to the original seam at the armpit and hem. I also belatedly felt like the jacket was hanging rather low, so I took the shoulder seam in 1/2 inch at the deepest part of the curve. The sleeves are narrowed 1/2 inch at the wrist, tapered to nothing at the elbow. I'm sorry not to have pictures of any of this... I generally am sewing late at night after the kids are asleep, making these decisions on the fly, and am too focused on getting sewing done to stop and take coherent photos.

The black wool that I chose to contrast with the gray embroidered wool is also very special to me-- it is a piece of wool suiting that I bought in Rome in 2014. I brought back two gorgeous pieces of wool suiting, and I haven't been able to bring myself to use them yet! But I decided to that this was the time, because the texture and weight was nearly a perfect match to the gray wool.

I've been reading Diane Ericson's blog lately, and while I haven't attempted anything near her level of artistry and creativity, she has got me thinking about the idea of "making" fabrics to suit your ideas. To complement the embroidered gray wool, I decided to sew free-form vertical lines on some of the pattern pieces after cutting them out. I wanted to keep the feel organic in a way that would complement, but not compete, with the circular pattern on the gray fabric. The thread is dark gray Gutterman topstitching thread. I went through 4 spools of the stuff that Joanne's carries (the outrageous cost of which has pushed me over the edge to start ordering my thread in bulk!).

The entire body of the jacket is underlined with light weight black silk organza. I thought the jacket would look cleaner and crisper with a bit of support. I ended up doing my "embroidery" of the black wool on top of the organza, thinking it would help support the stitching. The sleeves are underlined with black china silk, for the sole purpose of making the jacket wearable with sleeveless shirts. Seams are finished with black bias tape or black rayon Hug Snug. I discovered Hug Snug partway through making the jacket and fell in love-- the nearly bulk-less rayon is perfect for a jacket with many intersecting seams. I also used Hug Snug as a seam finish for the bottom hem, machine sewing it to the edge and hand blind-stitching it down. After discovering the Hug Snug, the only seam I finished with bias tape was the armhole because I thought it would benefit from the stretch of the bias.

For the facing, I just couldn't decide on anything from my stash, so I gave in to my desire to have an absolutely gorgeous denim from the Marcy Tilton online store. The black baroque pattern is flocked, so it is dimensional and luxuriously soft. I hope it holds up over time... but I think it would look lovely worn, too. The facing is interfaced with a fusible weft interfacing.

The pattern instructions have you sew the arm to the jacket sort of like a shirt... the sleeves are not set in, and the shoulder seam comes pretty low on the model, almost draping off the edge of her shoulder blade. I decided I wanted to go for a more structured look, so I moved the shoulder in by 1/2 inch on both sides. I set in the sleeve, using a double line of basting on the sleeve head to gather the fullness.

The wool eased in beautifully-- I can totally see why tailors love sewing with wool (my previous jackets have been cotton or rayon and it was much more work to ease in the sleeves without puckers). I pressed the seams out, towards the sleeve, then added a sleeve head--a piece of gathered, felted wool. My only regret is that my wool was navy-- it somewhat spoils the clean interior that I've strived to create. I'm not really sure how one would go about trying to hide a sleeve head on an unlined jacket. I considered adding a shoulder pad, but I don't think I need it.

I almost forgot the side seam pockets-- I had to seam rip the side seam to put them in. They aren't the best pockets, since by nature of the design of the jacket, they have to be sort of high, and it is a bit awkward to put my hands in them. I actually sewed them in lower, but I had to tear them out and move them up so that they didn't hang out the bottom of the jacket!
But I do love pockets on a jacket, and a welt pocket seemed like it would be a bit much on this design and I don't have a lining to do my usual lining pockets. Since the jacket is unlined and everything shows, I made the side seam pockets so that the good side of the fabric faced out, and lined them with china silk. At least they will be somewhere to stash my keys and phone.

The directions call for the sleeves to be hemmed. After all of the effort I put into this jacket, that just seemed to be a bit anticlimactic... so I added a simple cuff to the sleeves. The cuff is basically the bottom 2 inches of the sleeve pattern, traced off twice, once in my facing fabric and once in the fashion fabric. They are sewn right sides together on three sides, clipped and turned out, and attached to the shortened sleeve.

I went for a simple black matte button. I really love the double buttons, but I thought in this jacket the larger buttons worked well with the circular design of the gray wool. It is actually sort of neat how the circles almost line up with the buttons... a happy accident!

The buttonholes were a bit of a learning experience involving many hours with the seam ripper, mostly due to my inexperience with my new machine. Lesson one-- my machine will only go around the button holes two times. I was hoping for three, which worked beautifully on my test and gave a gleaming density, but got hung up when tried on the actual jacket. What a mess to unpick! Lesson two-- don't let the jacket touch the automatic buttonhole foot while in the process of making a buttonhole. Another mess to unpick! And I broke one needle trying to figure out how to sew a button on with a computerized machine. The bright side is that my new machine is at least consistent in how it behaves, at least so far, once I discover its quirks.

The best thing about this jacket is that it fits really well into my personal style. My work wardrobe is full of black and gray, with lots of floral and geometric patterns in neutrals. I love that many of my wardrobe pieces work well with each other, and enjoy dressing to play off different textures and patterns within this palette of mostly neutrals. This jacket plays really well into this scheme, and would work well with many of the other items I wear on a daily basis. I also have a sort of dressed-down office-appropriate style going on in my daily fashion choices, and the structured but playful lines of this jacket are perfect for this.

So that flocked baroque denim that I used for the facing... I still have nearly 1.5 yards. Might have to learn to make jeans, don't you think? I just bought some rivets and jeans buttons! That's a totally new frontier for me thought-- might take me awhile to get around to it.
Beautiful!
ReplyDeleteThank you Katherine! It is a wonderful pattern!
DeleteGorgeous work, just amazing.
ReplyDeleteWow that is absolutley beautiful. I love a different coat and this one is gorgeous. So much inspiration.
ReplyDeleteBeautiful jacket. I really appreciate hearing of the design choices and fitting changes that you made along the way.
ReplyDeleteVery creative !
ReplyDeleteChristine this jacket is OUTSTANDING! several of my students have made it and we did make some changes. But what you have done is wonderful.Happy Sewing!
ReplyDeleteJane Foster.... ,Walnut Creek, CA.
Christine this jacket is OUTSTANDING! several of my students have made it and we did make some changes. But what you have done is wonderful.Happy Sewing!
ReplyDeleteJane Foster.... ,Walnut Creek, CA.
Beautiful work and very creative.
ReplyDeleteWowza, what gorgeous jacket!! I just discovered you through Marcy Tilton's site, so forgive me for only having read this page and possibly saying something you already know, but so few people know this trick and when you mentioned wanting to stitch each buttonhole three times... if you were wanting to do it just to build it up for a more lush look, you could actually stitch a buttonhole once, but do it on top of 1-2 strands of buttonhole twist. Most buttonhole feet have a little finger that sticks out of the back where you can loop the twist an hold the strands forward under the foot, one under each side where the buttonhole stitches, so you end up with a padded buttonhole. Just gently hold in place, then pause before the final stitches are taken so you can remove it from the finger and draw up any excess, cross the strands over once, and let the machine take the final stitches to lock them down. Either snip close or use a hand needle to take them to the back side of the fabric and knot. You'll get an amazing buttonhole! It's also extremely durable, something I do on my hiking and outdoor gear as well. Again, so sorry if I go exploring on your blog and find this on the next darn page! lol
ReplyDeleteThat's how I learned to do buttonholes.
DeleteI would love to see a demonstration of making a padded buttonhole. I'm sure I'm not the only one. Perhaps ky-hiker , kathy or you would post a demo on YouTube. Your jacket is absolutely gorgeous!!!!
DeleteYou know, I have heard of the padded buttonhole, but it never clicked for me that might be the solution to getting a nice, rich buttonhole. I'll definitely have to try it! I just got an order of a bunch of topstitching thread and buttonhole thread, so that would help too.
DeleteStunning.
ReplyDeleteCongratulations on winning the Marcy Tilton contest. I just read it on her blog. Your jacket is absolutely wonderful. And perfectly sewn! I really love it :)
ReplyDeleteKatharina
I have to agree. This is a wonderful jacket and a really inspiring post. Love how you took us through the whole process. I remember well only sewing at night when the kids were asleep. So glad you won, you totally deserved it.
ReplyDeleteJust want to add my kudos to the rest! Amazing work on this jacket, as beautiful inside as outside, and the fabric choices are fantastic! Especially love the free-form stitching on the black Roman wool, but it is all beautifully done and fits you so well.
ReplyDeleteI read that Post and got it fine and informative. suiting fabrics buy online
ReplyDelete