One big wardrobe hole has been the complete lack of a light spring/fall coat. I've been making do with cardigans or blazers until it's cold enough to huddle under a wool coat. I considered using one of my already adjusted patterns and making it in a twill or very light coating weight fabric, but really the classic thing to fill this space in the wardrobe would be a trench coat.
 |
| If I look grumpy in these pics, it isn't about the trench. Apparently this location is popular with the Pokemon crowd, and the current pair are deep in conversation about their concealed carry permits. Grrrrr.....! |
Once I decided that it had to be a trench coat, I went about figuring out what really makes a trench coat a trench coat. The internet was quite happy to supply information about the trench's military origins, and how Burberry and Aquascatum created the first waterproof versions.
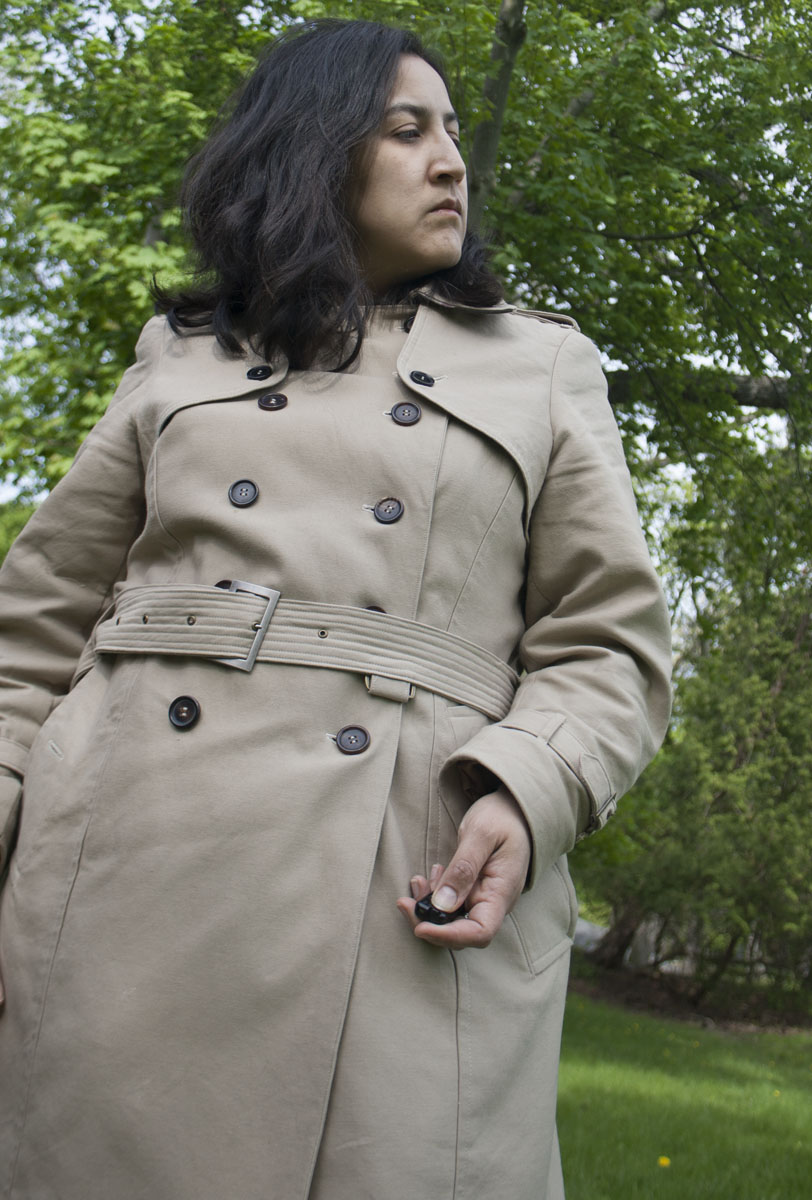
For my first trench, I decided to go totally traditional. Khaki, double-breasted, plaid-lined. All-the-way on the details... epaulettes, storm flaps, self-fabric belt, wrist straps, button pockets, etc. I also decided that I wanted a very traditional fit... not the skin-tight fit that seems to be very fashionable in women's trenches right now, and not the billowing oversized look from the 80s.


As I sorted through the available patterns, I had my usual problem... none of them was quite right for my vision of the classic trench. I definitely prefer indie patterns, and there are a number of attractive indie trench patterns. For example, the Named trench, which is absolutely lovely, has a more relaxed fit. The Sewaholic Robson strikes me as very feminine, with rounded lapels and no separate collar stand. The Deer and Doe Luzerne has a waist seam so it almost looks skirted, just adorable. The designers have each done a lovely job of making the trench their own... but I want a BORING, basic trench pattern!
Patternreview turned up with the answer... McCalls 5525, which has an astounding 69 reviews. This might not be remarkable for a dress pattern, but for a relatively complicated coat pattern, this seems to be quite a number. It is almost perfect. Double-breasted, princess seamed, separate collar stand, and all the trench details. There was the small detail of the pattern being out-of-print, but I was able to turn up a copy on Ebay with relative ease.
 |
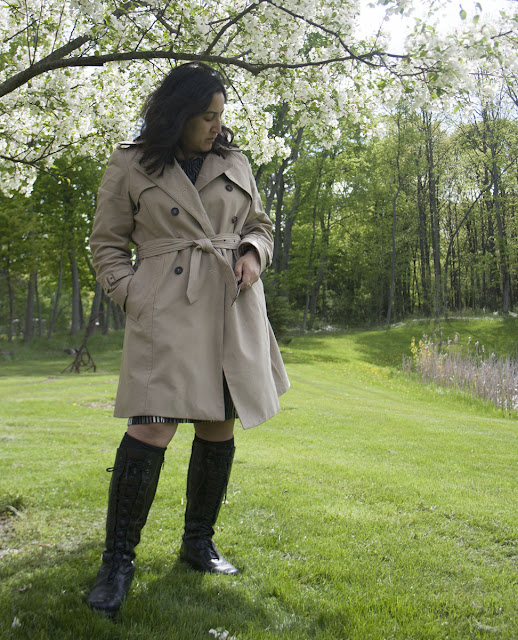
| Trying out the back tie look. |
After the issue of pattern choice was settled, then I had to find the perfect fabric. Traditionally, the trench is made of "showerproof" cotton gabardine. Supposedly this magical gabardine is woven so tightly that it repels rain. Burberry has said that they use waxed cotton thread to produce their proprietary gabardine fabric, increasing its water-repellency. Well, there is NOTHING on the US market that even tries to fit these claims. I only ended up with one sample of cotton gabardine in my search, and this sample was totally unremarkable.
I considered using some other kind of water-repellent fabric... but these plastic-based coated or membrane based fabrics don't really seem true to the idea of a classic trench. I'm also highly suspicious of the supposed "showerproof" fabrics available on the fashion fabric marketplace-- they rarely come with any details on what exactly creates the water-repellancy, and I definitely don't want a coat that will be damp from the inside out. I am tempted to make a Gore Tex trench just to prove it can be done, but I don't imagine this will be a pleasant exercise, and it definitely doesn't fit the stated goal of the "classic" trench.
Alas, I ended up settling on cotton twill. I ordered samples from anyone who had anything in a proper khaki cotton, and ended up with one from Mood. As of now, they still have it. No, they don't pay me anything!

As for the twill... it is okay. It sewed up nicely, it is a nice mid-weight. One side is a plain weave, the other had a longer weave... I used the plain weave side. I actually had a bit of a panic when cutting my fabric that I'd chosen the back side of the fabric, but it turned out fine, and I was careful to keep the same face consistently throughout the project. I had to be very careful to use a press cloth or keep the temperature of the iron down, there are a couple of little places where I forgot where the surface of the fabric is a bit damaged. Honestly I couldn't even find them to take a picture, so probably not worth worrying over.


In terms of fit, I think I misjudged the amount of ease in the pattern-- I usually expect Big 4 patterns to include MASSIVE amounts of ease. However, I think the ease on this one is actually quite reasonable, as I should have guessed from reading the reviews-- so I actually ended up adding quite a bit to my chosen size 16. The shoulders fit beautifully, but I ended up making just about everything else a bit larger. The 16 is, unfortunately, the largest of the smaller sizes, so I just had to guess what the grade to the 18 hip would have been. I deepened the armholes a bit, and added .5 inches to the side seams, increasing out to 1 inch at the hips. When I sewed it up in my fabric, things still ended up being a bit tighter than I wanted, so I decreased the seam allowances to .25 in the center back and at the side seams.
I did end up making quite a few changes. The biggest change was converting the sleeves to a two-piece sleeve. I used the an article from Threads magazine to make the change, in addition to comparing my altered sleeve to some other two piece sleeves from coats in my pattern collection. A two piece sleeve just makes sense to me-- our arms are not straight cylinders! The sleeves are set in like a traditional coat sleeve with a sleeve head (I used a piece of poly fleece this time, since I wanted to make sure it wouldn't shrink). I did not put in a shoulder pad... a very slim one would probably be a good idea and further help the shoulder hold its shape, but I didn't bother.

I also redrafted the back storm flap to be longer and have a bit more volume. I re-drew the front storm flap piece so that the storm flaps would meet under the arms, and I made two front storm flaps for symmetry. The storm flaps are sewn together at the shoulders and the underarm seam, and are only joined to the coat at the neck and armhole, supposedly offering another layer of storm protection.
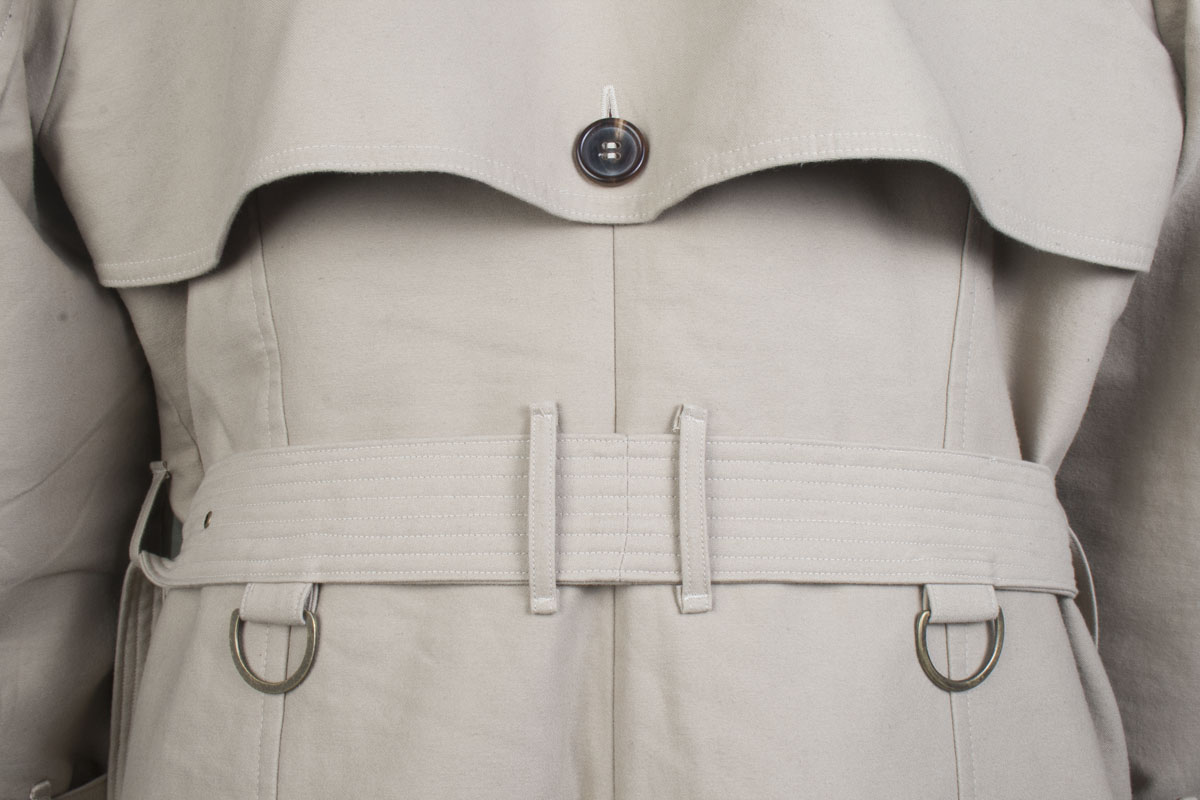
The belt is channel stitched, and has the classic trench D-rings. Supposedly they weren't actually for grenades, as is usually suggested, but for the more practical purpose of carrying map-cases and canteens. They also serve to hold the belt in place!
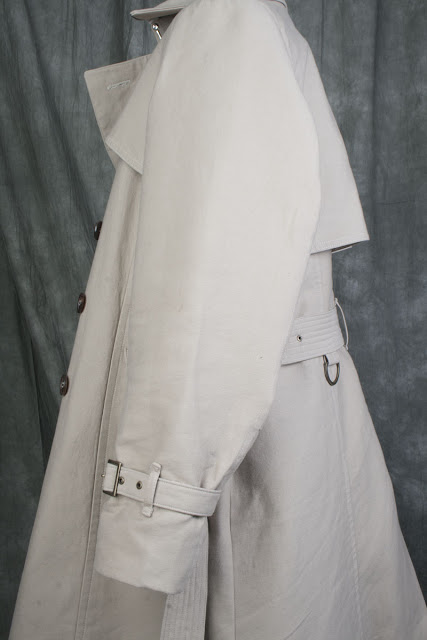
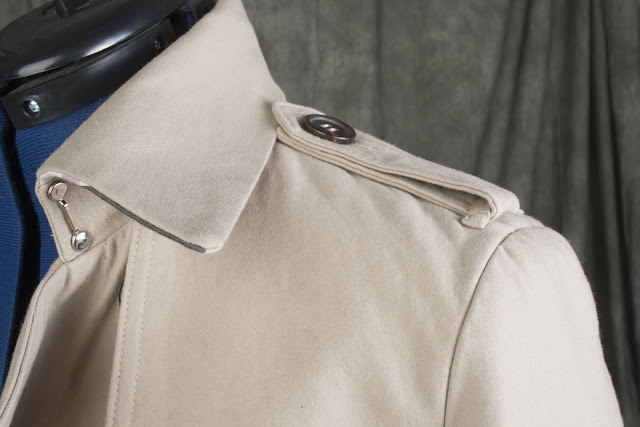
I made a full epaulette with a carrier, rather than a half-epaulette that is sewn into the shoulder seam. I simply doubled the length of the McCalls 5525 pattern piece. I also made the wrist strap a full wrap-around strap with carriers and a buckle, rather than a half-strap sewn into a seam. To make the full wrist strap, I just used the McCalls 5525 pattern piece, which reviewers note is notoriously long for its intended purpose. These little details just seem a bit more authentic to me.
I made a full epaulette with a carrier, rather than a half-epaulette that is sewn into the shoulder seam. I simply doubled the length of the McCalls 5525 pattern piece. I also made the wrist strap a full wrap-around strap with carriers and a buckle, rather than a half-strap sewn into a seam. To make the full wrist strap, I just used the McCalls 5525 pattern piece, which reviewers note is notoriously long for its intended purpose. These little details just seem a bit more authentic to me.

 |
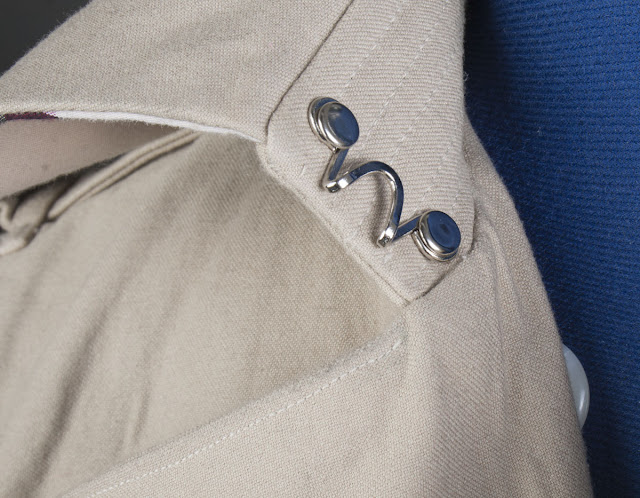
| Are these buckles on backwards? I think they are... |
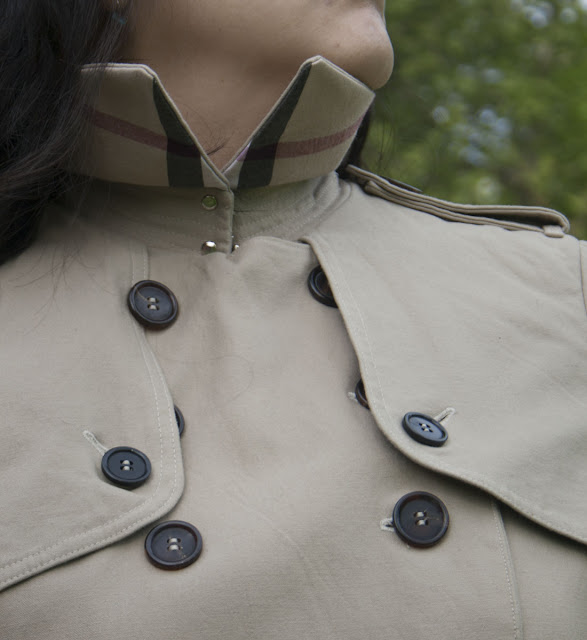
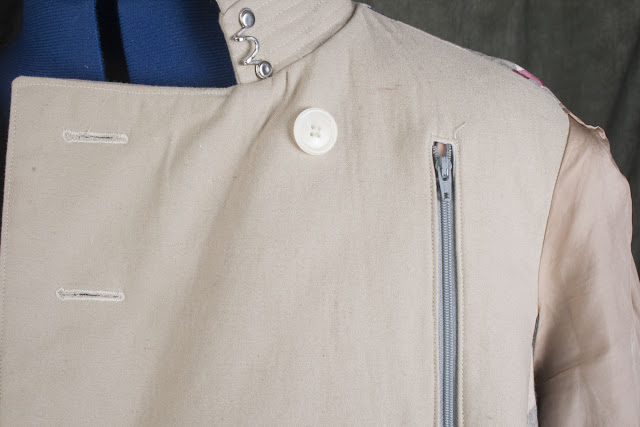
One thing that I did not notice until the coat was nearly done was that the collar on the pattern does not button all the way up. There are three pairs of buttons that hold the double breasted coat closed over the midsection, and that is it. My practical nature rebels against this... why make a coat with storm flaps if you can't actually button the collar up under the storm flap? Fashionable ladies, those storm flaps are just for decoration, apparently. I made mine button all the way up, with a full complement of 12 buttons.

However, the fact that I didn't realize this until late in the game shows that I really should have paid more attention to button placement on my muslin. I have the bad habit of winging such details... it always seems like I end up changing button placements to suit my body, so I hardly ever look at the suggested ones. For example, when deciding on the placement of buttons, I very carefully avoided having a pair in horizontal alignment across the most prominent part of the chest. If you know what I mean...

I also narrowed the lapel just slightly, which, in retrospect, definitely contributed to my button problems! I also made the lapels and the collar less rounded than is drafted in the pattern, I think the soft point is a more classic look.

So, months into the project when I actually decided to figure out button placement, I discovered that if I put the buttons where they needed to go to achieve a good seal around the neck, the coat was dramatically too tight over the chest. It looked like I needed a giant full-bust adjustment. In order to have the coat fit properly, I had to move the buttons more towards the center that I would have liked. This means that the storm flaps don't cover the top buttons completely like they should, and when the neck clasp is not fastened, there is a little bubble of fabric. Ah well! If I were to make this again, I would add length to the collar so that it will close when the coat is buttoned, and I might even add a small FBA to give a more room over the chest. It's unclear to me whether I had these problems because I should have sized up, or because the pattern wasn't designed to button closed.

Pretty much all of the versions made by other bloggers that I truly admire mentioned liberal use of fusible interfacing-- block-fusing large portions of the coat. I went with this, and the entire coat is block fused with a high quality lightweight interfacing from Fashion Sewing Supply. The front panels are fused with light weft interfacing, and the collar, collar stand, and lapels are tailored with fusible horsehair canvas using this technique which I previously made a tutorial for.


My biggest disappointment is that my interfacing seems not to like this fabric. There are places on the coat where the interfacing is "bubbling." This is caused by the interfacing separating from the fabric, and this is sometimes visible on the surface. I've gone back to some of the places and tried to get the interfacing to adhere better with plenty of steam and pressure, but it doesn't seem to work. Either I didn't do a good job when I first applied the interfacing, or it just doesn't stick as well to this fabric as it has to past coating projects.
Using fusible might have been a mistake in this project, in retrospect. The pattern did say to use a sew-in interfacing, and of course I ignored this advice. A well-loved trench coat has to take a certain amount of abuse... theoretically it will get wet on a regular basis, and the light color will require more frequent washing. Hopefully the lack of adhesion doesn't get so bad that it ruins the look of the coat.
I couldn't find anyone who talked about pad-stitching a lapel on a smooth surface fabric like twill, but actually, I think I probably could have done it after working with this fabric, it is surprisingly forgiving. Next time I sew a trench, I might give this a try rather than risking the fusible. But I do really like the drape the fusible gives the fabric, so I'm a bit torn on this point.
Anyway, I also added lots of other fun details. The throat latch is attached with rivets. The collar stand and the belt are supported with channel stitching. There's a gold hanging chain. The buttons are real horn (ebay!), and the button holes are keyhole buttonholes. Thankfully my sewing machine LOVED sewing buttonholes on this twill, since I had to make 16 of them!

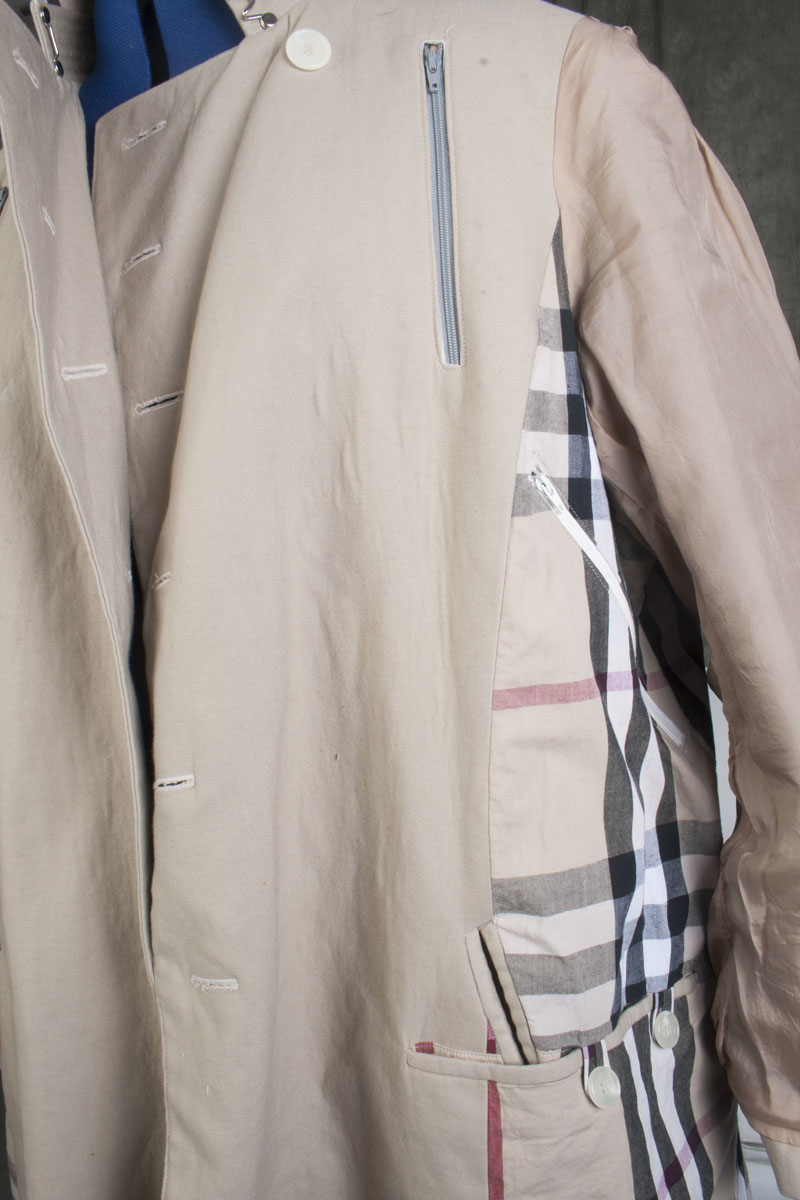
The lining is a Burberry-esque cotton plaid from an Etsy shop in the UK. I looked at SO MANY plaids, but the fact is, the Burberry design is sort of brilliant for a khaki color palette, really-- black and white with a touch of red, on a khaki base. I figure people can wonder... is it, or is it not a Burberry? The sleeve lining is beige rayon bemberg, to allow the coat to slip on and off easily.

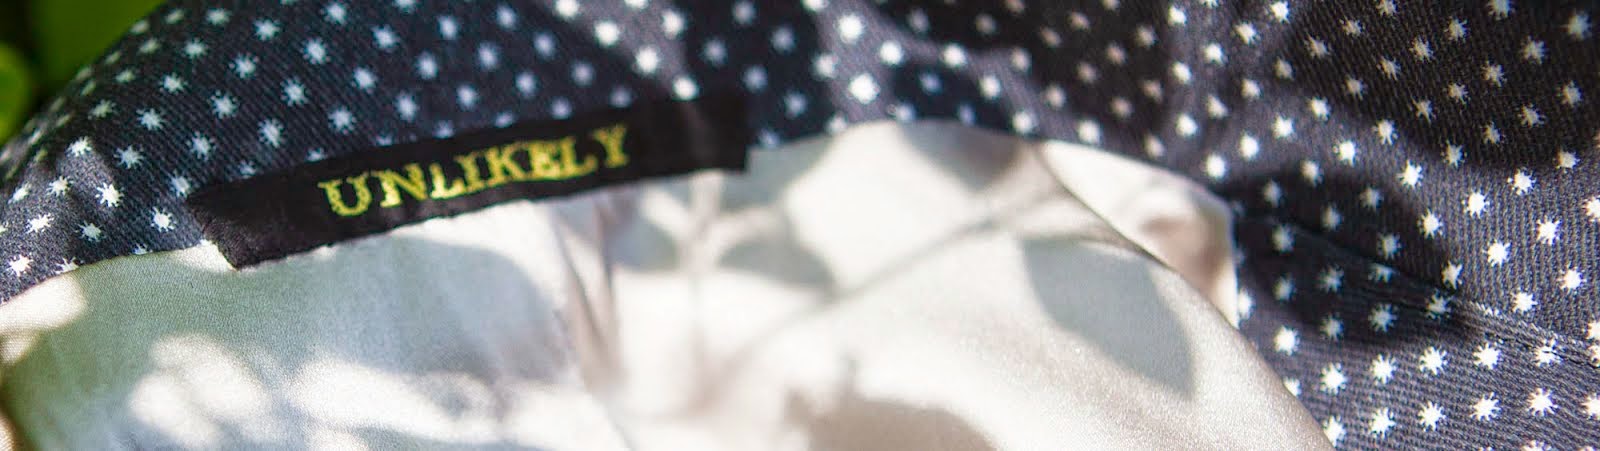
And to avoid any confusion, I've made a special Unlikely tag for this coat. The tag is printed on my Etsy printer, a Canon Pixma, and it uses pigment ink for its black ink. I used the freezer-paper method to print the design on plain muslin. Much cooler than the Burberry knight, IMHO.
 Another huge feature of the trench coat is its pockets. McCalls 5525 has an absurdly small pocket tucked into the front princess seam. I ignored this pocket arrangement, and made single welt pockets with a button closure, which is the most common pocket used in Burberry trenches. I really like this type of pocket on a coat because it can be placed in the most comfortable place, at just the right angle, and there is plenty of room to make the pocket bags as big as is desired.
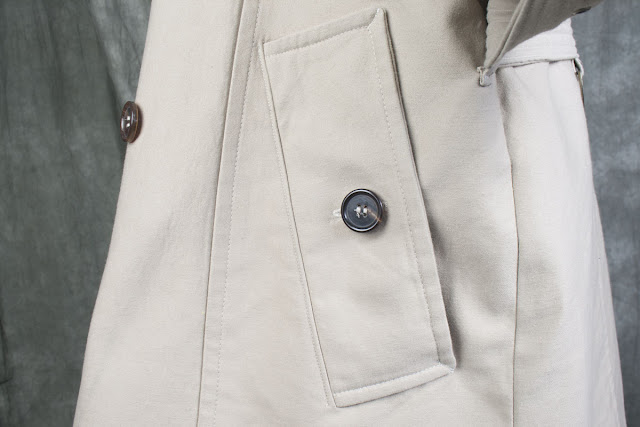
My pockets are HUGE. Funny story-- for a recent event I had to attend, I had forgotten the garnish for the dessert I had contributed. I walked past everyone in the reception hall with a giant can of whipped cream in my pocket. That's how big these pockets are! They have also proved to be vastly useful when out with the kids since I regularly end up carrying all sorts of random things like sneakers, wads of tissues, and the odd rock. I'm sure that's what the makers of the trench coat had in mind.

Not only are they huge, they are also pass-through pockets... there is a welt opening inside of the pocket that leads to the interior pocket. The interior pocket is also huge... I made it large enough to hold an iPad or a sketch book (two common things I'm often found carrying...). There are button closures so that it doesn't gape open when it is empty.
This trench has an absurd number of interior pockets. I sort of went a bit crazy- I guess I had secret agents on my mind. There are two zippered chest pockets (one on each side) and two zippered pockets in the lining, one at an angle and one horizontal. I'm REALLY good at making zippered pockets by now!

The back kick pleat was a bit of a struggle for me. I avoid hand sewing whenever possible, so I sought out directions on finishing a lined pleat by machine, and I thought I had it all worked out. It might have been just a bit wonky. Then I waterproofed the coat and let it hang dry, and after that it was just horrible looking, it looked like I was hiding a tail! I'm guessing the weight of being wet caused the twill to stretch more than the lining. I had to undo it all, and re-do it by hand so that it hung properly. Unfortunately I didn't manage to miter the pleat corners... can't win them all!
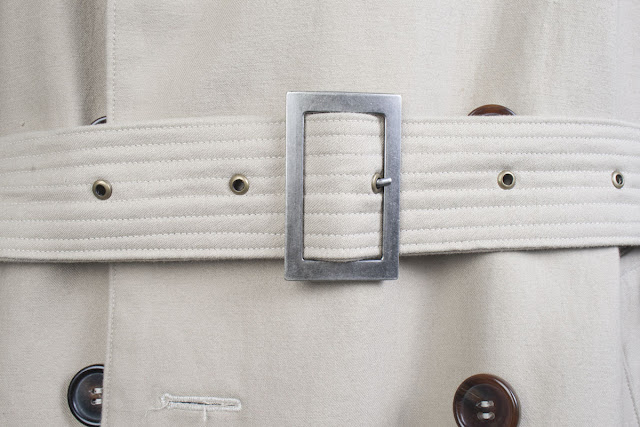
I went for a real belt buckle and grommets. I'm glad I went with the grommets... I actually looked into sewing eyelets, and apparently this is one thing my machine just doesn't do! I'm sort of shocked about that, it seems like a simple function for a machine that sews automatic buttonholes, and more useful than all those fancy stitches I never use. Seriously, if any of you know of a way to make a Janome 8077 sew an eyelet, I want to know, I've researched it and tried all sorts of hacks and I haven't come up with anything other than doing it manually, which is rather difficult. But the grommets are super simple once you get the hang of it. I ordered the grommets from Pacific Trimming, and the grommet setting tool from Ebay.
After wearing the coat for awhile now, I sort of see why everyone ties their trenches rather than actually make use of the buckle-- it is faster and more adjustable than buckling a buckle. And... if you belt is long enough to tie, you have to pull all that excess through the buckle, which is even more annoying. So the buckle mostly just hangs around, occasionally banging on things that I walk past. As much as I love the polished look of the belt buckle, I might skip it on future trenches!

I just had to do the classic tartan-on-the-bias under collar. The under collar and collar stand are supported by horse hair canvas so that they won't get floppy with time. Or at least, I hope so.

When the trench was totally done, I waterproofed it in Nikwax Cotton Proof. I just measured out the right proportions in a big tub (actually, an empty fabric storage bin!), and dumped my coat in. I followed the directions for soaking and hand-agitation. Since it was so incredibly heavy when wet, I put it in the washer for a spin cycle to wring it out, then hung it to dry. It seems to have worked, water beads on the surface! But it is really only "shower" proof, the water will sink in if left for any length of time. Better than nothing though.

Well, that's about it! It took me SO LONG to finish this project. I've been at this for months. I didn't take it very seriously when other bloggers talked about what a big project their trenches were, but now I have to agree! The project was also dragged out by the fact that I was doing this during a very busy time and I was snatching an hour here and 30 minutes there. But I think it is well worth it, I love wearing it, it makes me smile at a nice cool rainy day!
Can you imagine, I'm already planning my next trench? Yes I am! I'm in the collecting materials phase of the project. While I love this trench, it is a bit dramatic... it is very heavy and sort of on the long side, and I feel very conspicuous wearing such a light color. My next trench will be lighter weight-- I'll lay off the interfacing, probably leave it unlined, and shorter (mid thigh). It will definitely be a darker color. I also really want the classic raglan sleeve trench... and that will require some pattern alteration!
Speaking of material gathering... I have FINALLY found a true showerproof cotton fabric. After much searching, I came across Ventile and Etaproof fabrics. I was unable to obtain Ventile (the UK outfitter refused to ship to the US, and the UK manufacturer didn't respond to my inquiries) but a German outdoor store, Extremtextile in Dresden, was perfectly willing to ship 3 yards of EtaProof, which is made in Sweden. I'm excited about my EtaProof, but it might be years before this project actually happens!
Until then, expect to see lots of khaki around here!
Using fusible might have been a mistake in this project, in retrospect. The pattern did say to use a sew-in interfacing, and of course I ignored this advice. A well-loved trench coat has to take a certain amount of abuse... theoretically it will get wet on a regular basis, and the light color will require more frequent washing. Hopefully the lack of adhesion doesn't get so bad that it ruins the look of the coat.
I couldn't find anyone who talked about pad-stitching a lapel on a smooth surface fabric like twill, but actually, I think I probably could have done it after working with this fabric, it is surprisingly forgiving. Next time I sew a trench, I might give this a try rather than risking the fusible. But I do really like the drape the fusible gives the fabric, so I'm a bit torn on this point.

Anyway, I also added lots of other fun details. The throat latch is attached with rivets. The collar stand and the belt are supported with channel stitching. There's a gold hanging chain. The buttons are real horn (ebay!), and the button holes are keyhole buttonholes. Thankfully my sewing machine LOVED sewing buttonholes on this twill, since I had to make 16 of them!


And to avoid any confusion, I've made a special Unlikely tag for this coat. The tag is printed on my Etsy printer, a Canon Pixma, and it uses pigment ink for its black ink. I used the freezer-paper method to print the design on plain muslin. Much cooler than the Burberry knight, IMHO.

My pockets are HUGE. Funny story-- for a recent event I had to attend, I had forgotten the garnish for the dessert I had contributed. I walked past everyone in the reception hall with a giant can of whipped cream in my pocket. That's how big these pockets are! They have also proved to be vastly useful when out with the kids since I regularly end up carrying all sorts of random things like sneakers, wads of tissues, and the odd rock. I'm sure that's what the makers of the trench coat had in mind.

This trench has an absurd number of interior pockets. I sort of went a bit crazy- I guess I had secret agents on my mind. There are two zippered chest pockets (one on each side) and two zippered pockets in the lining, one at an angle and one horizontal. I'm REALLY good at making zippered pockets by now!

The back kick pleat was a bit of a struggle for me. I avoid hand sewing whenever possible, so I sought out directions on finishing a lined pleat by machine, and I thought I had it all worked out. It might have been just a bit wonky. Then I waterproofed the coat and let it hang dry, and after that it was just horrible looking, it looked like I was hiding a tail! I'm guessing the weight of being wet caused the twill to stretch more than the lining. I had to undo it all, and re-do it by hand so that it hung properly. Unfortunately I didn't manage to miter the pleat corners... can't win them all!

I went for a real belt buckle and grommets. I'm glad I went with the grommets... I actually looked into sewing eyelets, and apparently this is one thing my machine just doesn't do! I'm sort of shocked about that, it seems like a simple function for a machine that sews automatic buttonholes, and more useful than all those fancy stitches I never use. Seriously, if any of you know of a way to make a Janome 8077 sew an eyelet, I want to know, I've researched it and tried all sorts of hacks and I haven't come up with anything other than doing it manually, which is rather difficult. But the grommets are super simple once you get the hang of it. I ordered the grommets from Pacific Trimming, and the grommet setting tool from Ebay.
After wearing the coat for awhile now, I sort of see why everyone ties their trenches rather than actually make use of the buckle-- it is faster and more adjustable than buckling a buckle. And... if you belt is long enough to tie, you have to pull all that excess through the buckle, which is even more annoying. So the buckle mostly just hangs around, occasionally banging on things that I walk past. As much as I love the polished look of the belt buckle, I might skip it on future trenches!


When the trench was totally done, I waterproofed it in Nikwax Cotton Proof. I just measured out the right proportions in a big tub (actually, an empty fabric storage bin!), and dumped my coat in. I followed the directions for soaking and hand-agitation. Since it was so incredibly heavy when wet, I put it in the washer for a spin cycle to wring it out, then hung it to dry. It seems to have worked, water beads on the surface! But it is really only "shower" proof, the water will sink in if left for any length of time. Better than nothing though.

Well, that's about it! It took me SO LONG to finish this project. I've been at this for months. I didn't take it very seriously when other bloggers talked about what a big project their trenches were, but now I have to agree! The project was also dragged out by the fact that I was doing this during a very busy time and I was snatching an hour here and 30 minutes there. But I think it is well worth it, I love wearing it, it makes me smile at a nice cool rainy day!
Can you imagine, I'm already planning my next trench? Yes I am! I'm in the collecting materials phase of the project. While I love this trench, it is a bit dramatic... it is very heavy and sort of on the long side, and I feel very conspicuous wearing such a light color. My next trench will be lighter weight-- I'll lay off the interfacing, probably leave it unlined, and shorter (mid thigh). It will definitely be a darker color. I also really want the classic raglan sleeve trench... and that will require some pattern alteration!
Speaking of material gathering... I have FINALLY found a true showerproof cotton fabric. After much searching, I came across Ventile and Etaproof fabrics. I was unable to obtain Ventile (the UK outfitter refused to ship to the US, and the UK manufacturer didn't respond to my inquiries) but a German outdoor store, Extremtextile in Dresden, was perfectly willing to ship 3 yards of EtaProof, which is made in Sweden. I'm excited about my EtaProof, but it might be years before this project actually happens!
Until then, expect to see lots of khaki around here!